Team Trax:
Vacation and holiday tracking for Jira
Team Calendar: Manage home office 🏠 , sick leaves 🤒 , vacation🍹 and shared assets 💻 of your teams easily
User-friendly calendar view for big teams
Team Calendar helps the organization of team works. Allows employers to review their team members’ presence in office. Employees can make easy request for home office, vacation or other event types in calendar.
Configurable event types and limits
Simply to make different types of events: home office, vacation, sick leave, on-site work, etc. customized for unique needs of companies. Define annual limits for event types and sub-types.
Workload and holiday schemes
Create workload schemes to manage different types of users workload. The worklogs for the events are based on a users workload scheme. Holiday schemes allow to define national holidays.
More details
Team Trax is a unique tool for Jira which helps to review and manage company teams, it can be integrated with Microsoft Exchange and Google Calendar.
Main features:
- Three types of calendar view: team calendar, annual calendar, my calendar
- Configurable event types (working status): according to the needs of companies (home office, on-site work, holiday, unpaid leave, sick leave, etc.)
- Holiday and workload schemes: able to manage national holidays and different types of users workload
- Annual limits: for event types and sub-types
Useful for:
- Managers: can view and organize their teams and easily approve home office, holiday or other requests.
- Work teams: team members can easily watch the working status of each other to coordinate their cooperative work, and increase efficiency.
- HR/Finance: event types can be logged automatically in worklogs, which can help with payroll calculations
Accessing the add-on configuration
Cloud version
To access the main configuration screen of Team Trax, you either have to be in one of the main three administrative groups of a Jira site or you need to have the Team Trax Add-on Configuration global permission.
The main admin groups are the following:
- administrators
- site-admins
- jira-administrators
Plean note that for recently created sites Atlassian has renamed the default site-admins group to org-admins. If you trouble accessing the Configuration screen, either create a site-admins group and add your user in it, or grant yourself the Team Trax Add-on Configuration global permission.
Data Center version
In order to access the configuration screen, you need to be an administrator - i.e. granted either the Jira administrators or the Jira System administrators global permission - or you need to be granted the Team Trax Configuration global permission.
Team Trax Administrator Permission
On the main configuration screen you can assign groups or individual users to the Team Trax Administrator role. Users in the Team Trax Administrators will be able to configure the more funtional aspects of Team Trax, while the main configuration screen contains more technical configurations, such as setting up the external calendar synchronization.
This permission can be given to application users or user groups1. Having this permission you will have access to the following screens:
Please note! The added users or the members of the added groups require the Browse users and groups global permission to use the user search feature through JIRA. (For instance in User Settings)
How to give someone Team Trax Administrator permission?
On the navigation bar click Configuration.
Add or remove user(s) and/or group(s)1 by the input field under Permissions.
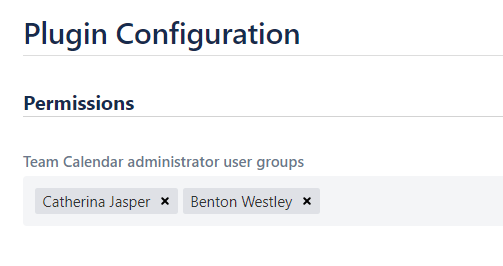
After editing, click the Save button at the bottom of the page.

In the cloud version, only individual users can have this permission, therefore adding a user group will extract the members of the group and add them one by one.
General Settings
In this section you can manage the following options:
- Enabling audit log creation for user actions: By default audit logs for events are created only if an approver updates a user's event. With this option enabled, audit logs are created if the owning user creates or updates his/her own event.

Display Settings
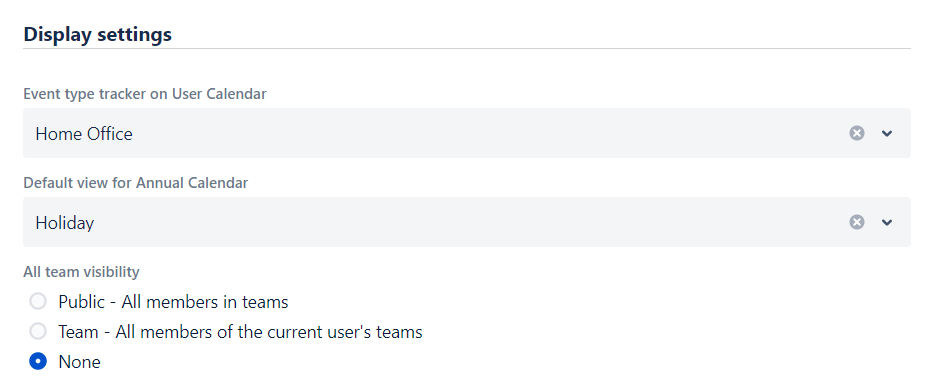
Event type tracker on User Calendar
By setting this field's value you can choose which Event Type should be shown by default on the User Calendar views for all users.
Default view for Annual Calendar
By setting this field's value you can choose which Event Type should be shown by default on the Annual Calendar views for all users. If none set, the Event Type with the lowest ranking will be shown by default or none if none exists.
All Team Visibility
The team list on the Team and Annual Calendar can be extended by an "All" option which is turned off by default. It can be added in the following two ways:
- Public: users will see all members of teams they have permission to see
- Team: users will see all members of teams where they have an active membership and have permission to see
Find out more about Team Visibility at the Team page.
External Calendar Settings
Team Trax can be integrated with Microsoft Exchange Calendar or Google Calendar (Google Workspace) as we currently support only these two service providers.
How to configure?
On the navigation bar click Configuration.
Let's head to the External calendar settings section.
Please select from the dropdown the preferred calendar provider. After the selection, some required fields will be visible. These are necessary for the client authentication of these providers.
Microsoft exchange
For more information on how to configure Microsoft Exchange, see Microsoft Exchange setup.
![]()
Google Workspace
You can find more information about Google Workspace configuration on the Google Workspace setup page.
![]()
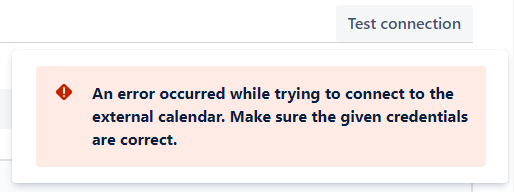
You can test easily that the given authentication informations are valid or not by clicking on the Test connection button. After a while it will show you the result.

After editing, click the Save button at the bottom of the page.
Microsoft exchange settings
Required permissions
- You need to be a JIRA Administrator
Team Trax can be integrated with Microsoft Exchange Calendar. In order to do so, please follow the steps below:
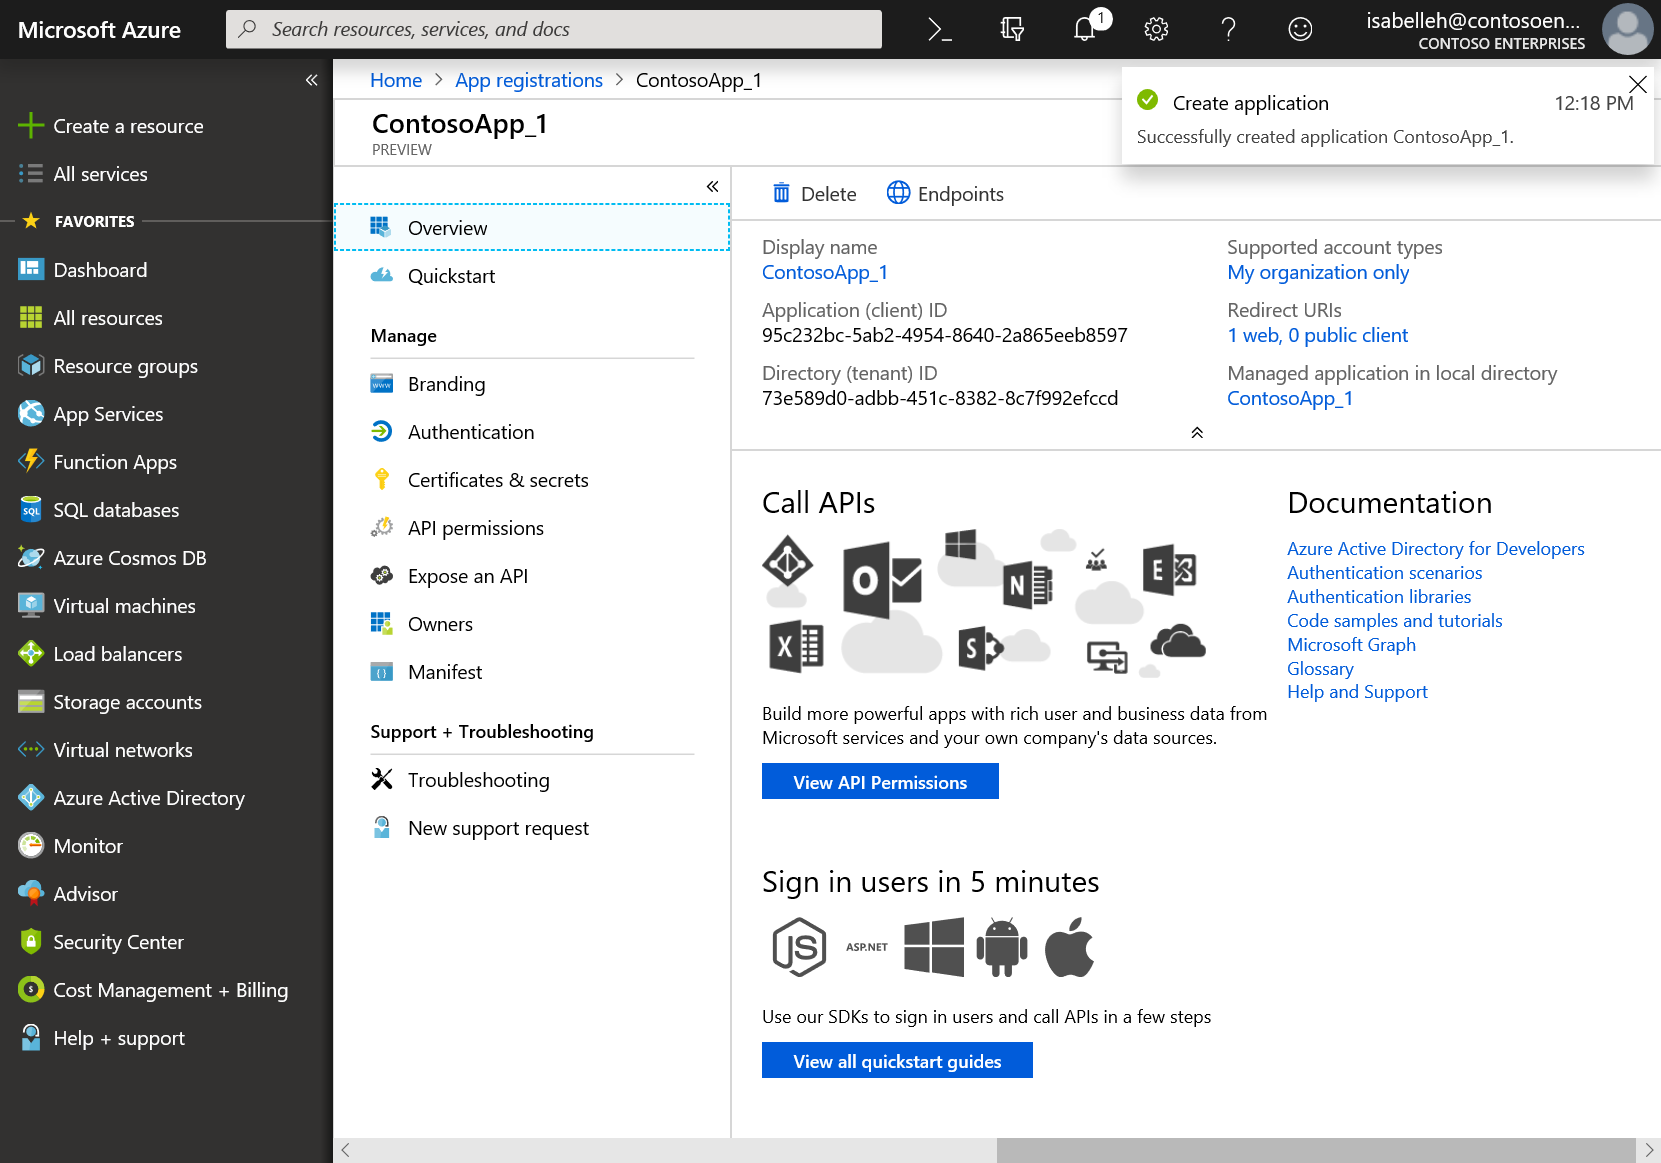
Register an application with the Microsoft identity platform by following these steps:
-
Sign in to the Azure portal using either a work or school account or a personal Microsoft account.
-
If your account gives you access to more than one tenant, select your account in the top right corner, and set your portal session to the Azure AD tenant that you want.
-
In the left-hand navigation pane, select the Azure Active Directory service, and then select App registrations > New registration.
-
When the Register an application page appears, enter your application's registration information:
- Name - Enter a meaningful application name that will be displayed to users of the app.
- Supported account types - Select which accounts you would like your application to support (personal Microsoft accounts are currently not recommended by Microsoft). If unsure, choose Accounts in this organizational directory only.
Supported Account Types Description Accounts in this organizational directory only Select this option if you're building a line-of-business (LOB) application. This option is not available if you're not registering the application in a directory.
This option maps to Azure AD only single-tenant.
This is the default option unless you're registering the app outside of a directory. In cases where the app is registered outside of a directory, the default is Azure AD multi-tenant and personal Microsoft accounts.Accounts in any organizational directory Select this option if you would like to target all business and educational customers.
This option maps to an Azure AD only multi-tenant.
If you registered the app as Azure AD only single-tenant, you can update it to be Azure AD multi-tenant and back to single-tenant through the Authentication blade.Accounts in any organizational directory and personal Microsoft accounts Select this option to target the widest set of customers.
This option maps to Azure AD multi-tenant and personal Microsoft accounts.
If you registered the app as Azure AD multi-tenant and personal Microsoft accounts, you cannot change this in the UI. Instead, you must use the application manifest editor to change the supported account types. -
Redirect URI does not need to be configured.
-
When finished, select Register.

Azure AD assigns a unique application (client) ID to your app, and you're taken to your application's Overview page. To add additional capabilities to your application, you can select other configuration options including branding, certificates and secrets, API permissions, and more.
-
In the left-hand navigation pane select App registrations and click on the newly created app registration
-
Under Certificates & secrets create a new Client secret
-
Go to API permissions and add the following permissions by selecting Microsoft Graph for the API and Application Permissions as the type of permissions:
Microsoft Graph (4):- Calendars.ReadWrite
- Calendars.ReadWrite.All
- User.Read
- User.Read.All
See full guide: https://docs.microsoft.com/en-us/graph/auth-register-app-v2
Under Microsoft Exchange settings:
- Provide Directory (tenant) ID and Application (client) ID as well as the Client secret
![]()
Configuring the Google Workspace integration
In order to integrate TeamTrax with Google Workspace (former G Suite), you need to provide service account credentials on the configuration page. These include a generated email address that is unique and a public/private key pair. For TeamTrax to be able create events on behalf of your users, you need to enable domain-wide delegation as well and provide the generated client ID.
Create a Service Account
To generate service-account credentials, or to view the public credentials that you've already generated, do the following:
- Open the Service accounts page.
- If prompted, select a project, or create a new one.
- Click + Create service account.
- Under Service account details, type a name, ID, and description for the service account, then click Create.
- Optional: Under Service account permissions, select the IAM roles to grant to the service account, then click Continue.
- Optional: Under Grant users access to this service account, add the users or groups that are allowed to use and manage the service account.
- Click + Create key (JSON), then click Create.
- Download the generated private key file.
You can leave the optional items (5, 6) blank.
Enable Domain-wide Delegation
To enable domain-wide delegation:
- From the Admin console, go to Main menu > Security > API Controls.
- In the Domain wide delegation pane, select Manage Domain Wide Delegation.
- Click Add new.
- In the Client ID field, enter the service account's Client ID (You can find your service account's client ID in the Service accounts page - see above).
- In the OAuth scopes field, enter the list of scopes separated by comma that your application should be granted access to. For example, if your application needs domain-wide full access to the Google Drive API and the Google Calendar API, enter: https://www.googleapis.com/auth/drive, https://www.googleapis.com/auth/calendar.
- Click Authorize.
To be able to save your domain-wide configuration, you have to enter a product name or the save button will not be enabled.
TeamTrax only needs the https://www.googleapis.com/auth/calendar scope to work.
Enable Calendar API
Make sure Calendar API is enabled by going to the following address: https://console.developers.google.com/apis/api/calendar-json.googleapis.com/overview
About erasing data
Team Trax administrators can clear their tenant's data anytime they want (either to reset their tenant after an evaluation, or becuase they are uninstalling Team Trax and want their data to be deleted before the default data retention period of 90 days). In order to do that they need to click the 'Erasing All Data" on the configuration page.
How to erase data?
On the navigation bar click Configuration.
Scroll down to the Erasing All Data button.

By clicking the button, a deletion request is sent. Data deletion will be scheduled to happen in 24 hours.
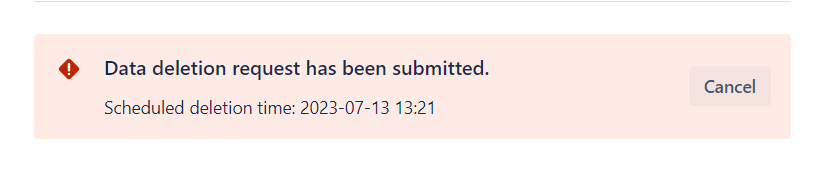
An information bar will be displayed at the top showing the scheduled deletion time. You can always cancel your request by clicking on the Cancel button in the information bar.
Events
An Event serves to indicate the time spent on different activities (either at work or out of office) by user. For instance users can request a holiday event by creating an event with holiday event type in their User or Team Calendar.
Intervals: Events can last multiple days, but only one event can be assigned to one day (at the moment).
Events also have length:
- All Day: the time spent on the event is determined by the workload scheme associated to the event owner
- Half Day: the time spent on the event is determined by the workload scheme associated to the event owner (the workload value of the day specified is divided by 2)
- Custom length: if partial logging is enabled on the chosen event type, a custom duration can be set for the event with a start time (this duration can't exceed the workload value of the day specified, which is determinated by the workload scheme associated to the event owner)
A description can optionally be added to every event in order that the event owner can share additional information related to their activity.
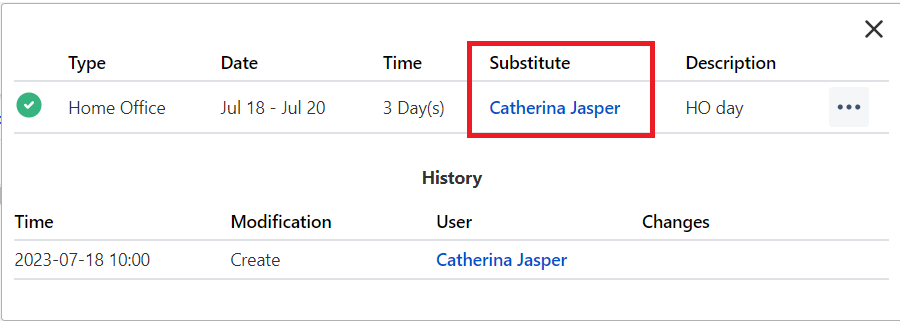
Event owners have the opportunity to assign substitute(s). A simple member can set a general substitute, meanwhile Team Approvers can delegate their approver permissions also to another user for the day(s) of the event.
Event status
Events with Single Approval Workflow require to be approved by team approvers. On event creation and editing their status is set to requested.
Approvers get notified whenever such an event was created in their team(s). They can decide wheter to Approve or Reject these requests.
Note: Approvers can't approve their own events unless they haven't any active approver in any of their teams.
The current status of the event is indicated by a small icon on the event details popup:
| Approved | Requsted | Rejected |
Requested and Rejected events don't take part in limit calculations.
How to manage events?
Learn more about event creation, deletion, etc. on the Calendar Actions page.
Calendar Actions
Activities stated below can be accomplished on the Team Calendar and on User Calendar annual view.
How to create and edit an event?
To create a new event click on an empty cell representing the targeted start date.
To edit an existing event click on the targeted event. On the opened popup, click on the More icon, then select Edit from the dropdown.

In both cases, a modal will be opened where the following attributes can be set:
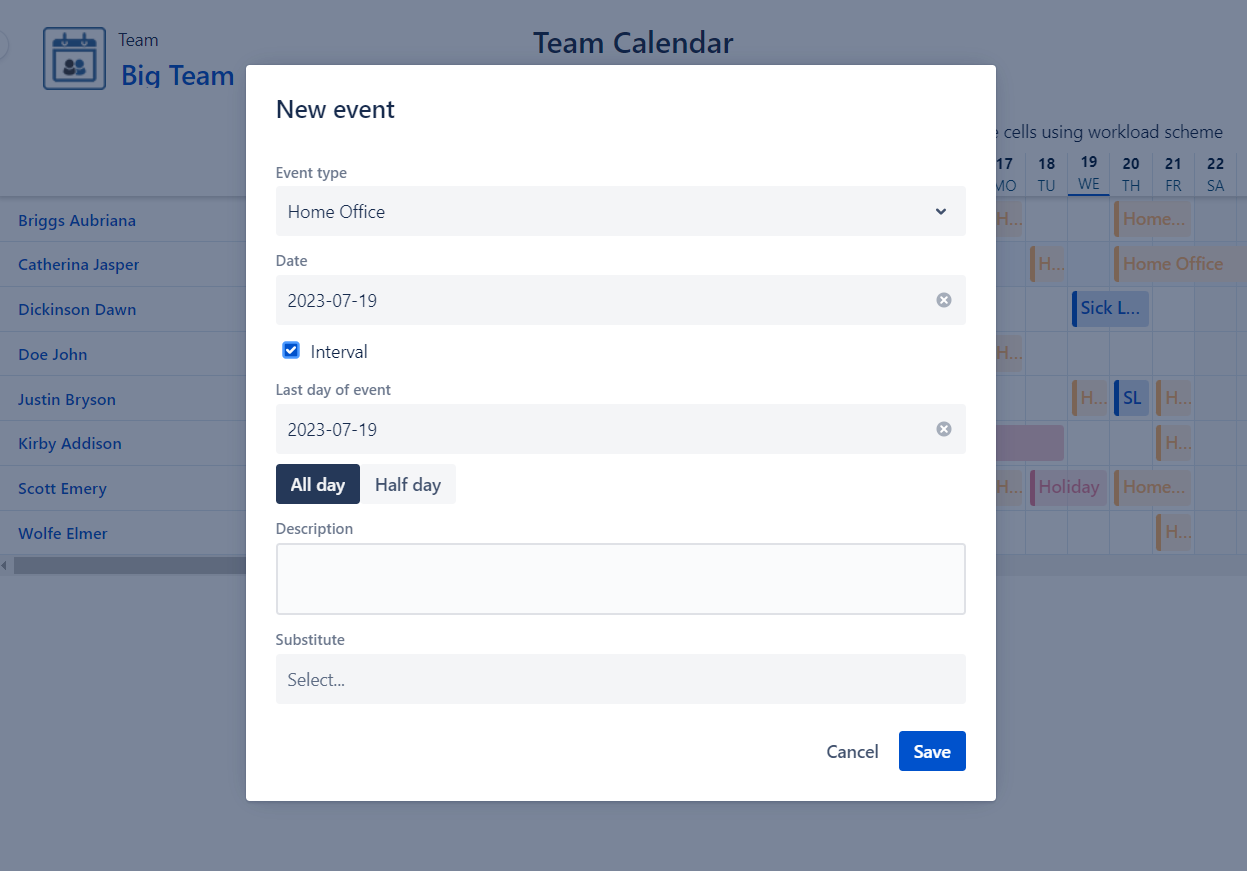
- Event Type: select the desired event type from the dropdown
- Date: select the desired start date on the date picker
- Interval: if checked, a second date picker will be displayed that represents the end date of the event
- Length (All day / Half day / Custom): choose length of the event by day
- Description: optionally set description that could help to identify the event easier
- Substitute: optionally set substitute employee for the duration of the event
- Substitute Approver (for approvers only): optionally set substitute approver for the duration of the event
Learn about these fields on the Events page.
Click the Save button when done.

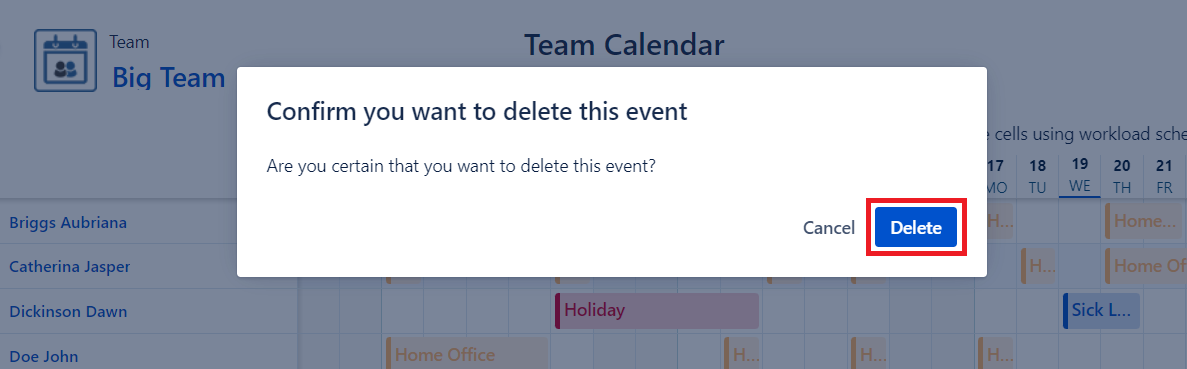
How to delete an existing event?
To delete and event click on the targeted event. On the opened popup, click on the More icon, then select Delete from the dropdown.
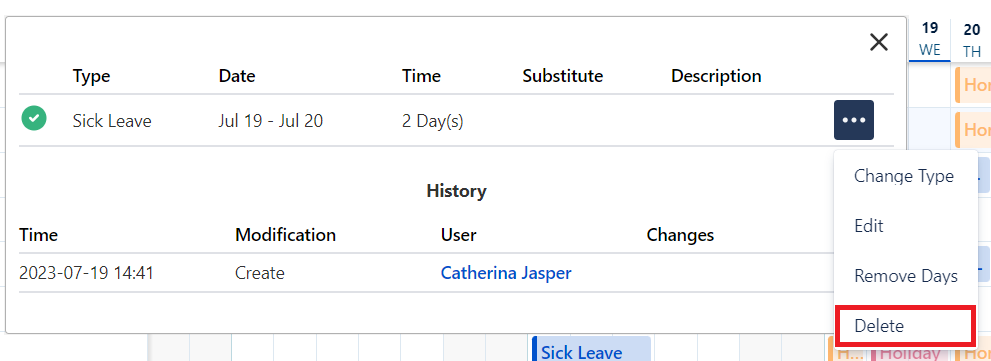
A confirmation modal will be showned, click on the Delete button again.
How to change event type of an existing event?
To change the type of the event click on the targeted event. On the opened popup, click on the More icon, then select Change Type from the dropdown.

A modal will be opened. Select the desired event type.
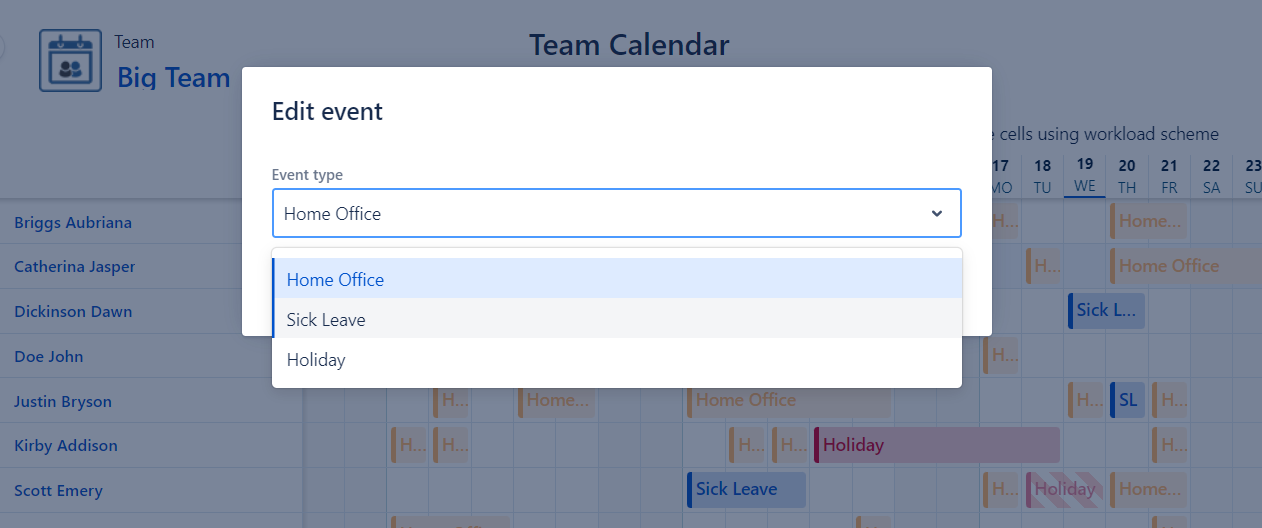
Click the Save button when done.
How to remove days from an existing multi day event?
To remove days from an event click on the targeted event. On the opened popup, click on the More icon, then select Remove days from the dropdown.
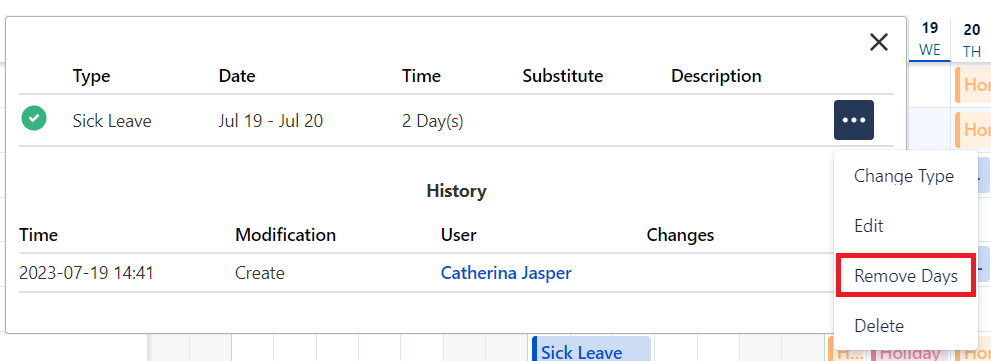
A modal will be opened. Remove day(s) by clicking on the corresponding Remove button(s). To undo deletion, click on the Keep button.

Click the Save button when done.
How to merge adjacent events?
Adjacent events with the same event type can be merged into one event.
In order to do that click on one of the targeted events. On the opened popup, click on the More icon, then select Merge next/previous from the dropdown.

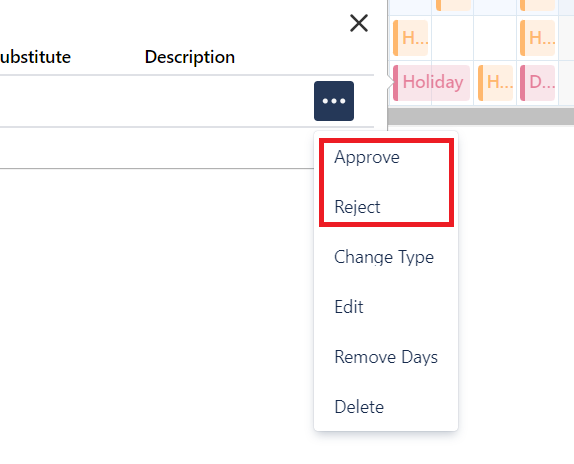
How to approve or reject a requested event?
Approvers and substitute approvers have right to approve or reject requested events.
In order to do that click on one of the targeted event. On the opened popup, click on the More icon, then select Approve/Reject from the dropdown.
Event Substitutes
During event creation and editing an optional substitute and/or substitute approver can be selected.
General Substitute
Event owners can decide to assign a colleague as their substitute during the time of the event. This substitute is appearing on the details view of the event and is visible by all other users.
How to set a substitute?
During event creation or editing, start typing the name of the targeted employee into the substitute field, then_ click on the full name_ when it's appearing in the results.
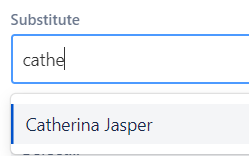
After saving the event, the substitute will be showned on the event details popup.
Substitute Approver
Team Approvers has an additional option on event creation and editing where they can appoint a substitute approver. Find out more at substitute approvers page.
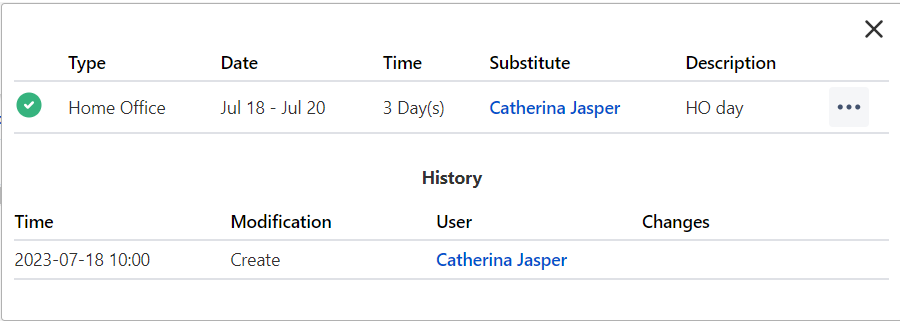
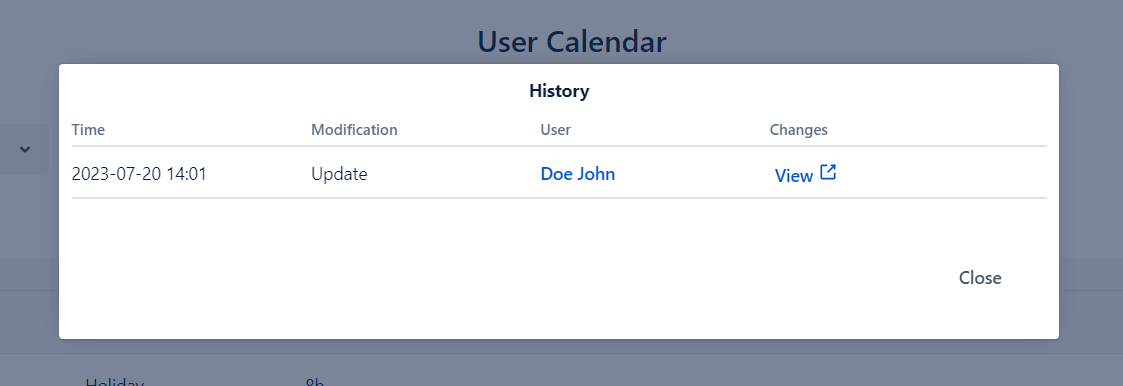
Event History

Users who are Team Lead, Approver or Team Trax Admin can see event histories by clicking on the event either in Team Calendar or User Calendar.
History logs are created in the following cases:
- whenever an event was created on behalf of someone else
- whenever a requested event status has changed
Additional logs appear in Audit Logs for Team Lead and Team Approvers:
- about approved event deletion
- about someone else's event deletion
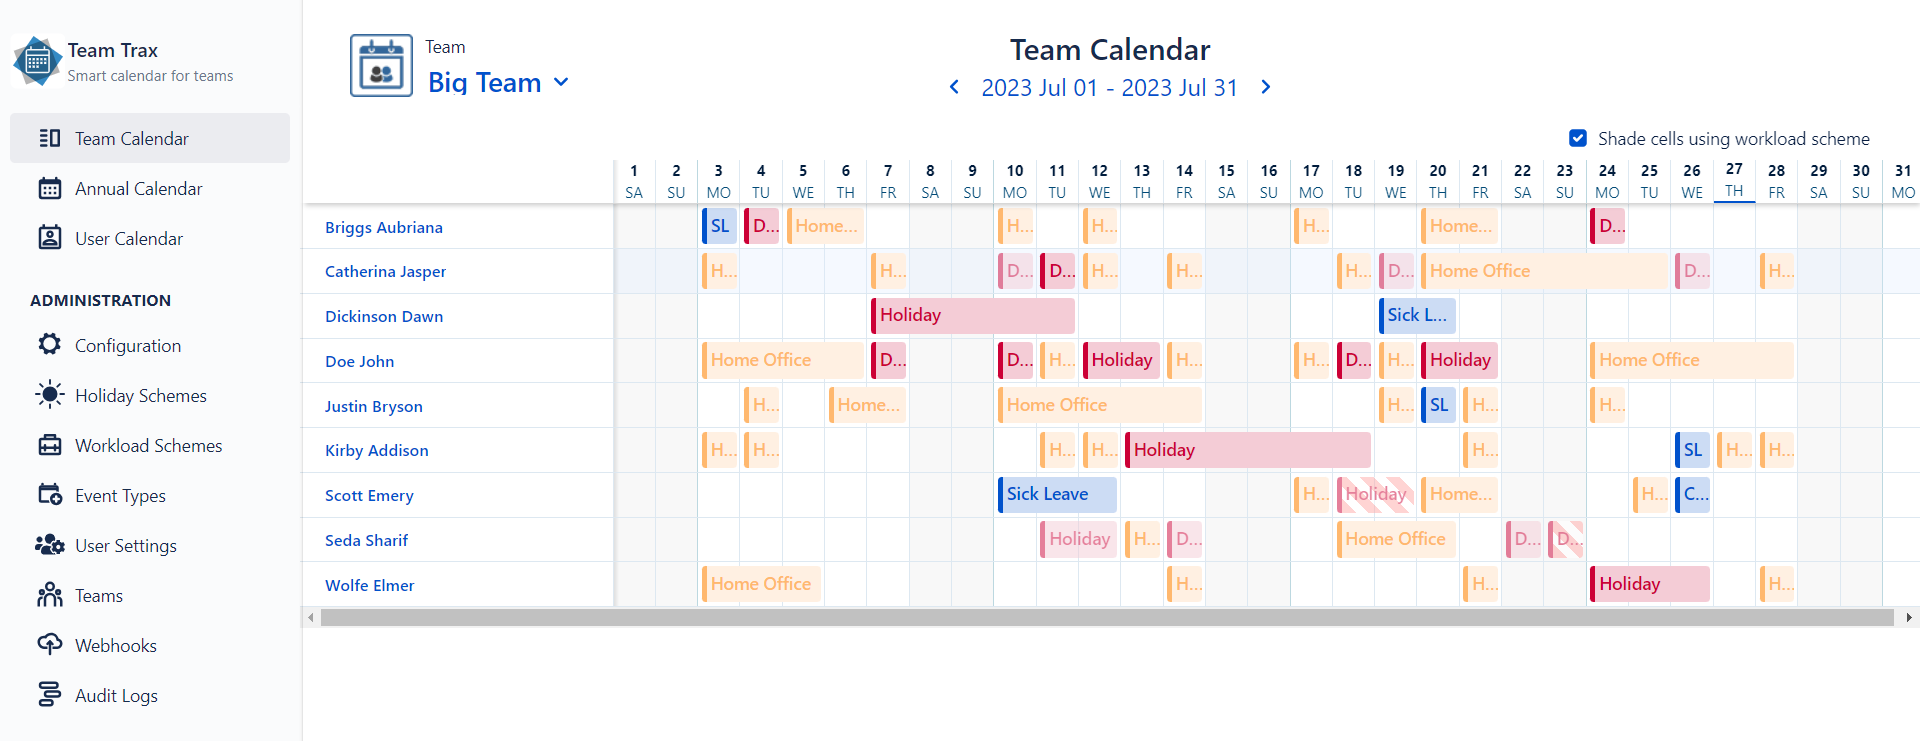
Team Calendar
The Team Calendar is accessible for anyone who is member in at least one team. Learn more about calendars' visibility on the General Permissions page.
It provides a monthly overview about events of the selected team's members. Unapproved events are slightly transparent, meanwhile rejected events are marked by crossed out pattern. Grey cells indicates weekends, while the red ones indicates Public Holidays.

How to access the Team Calendar?
On the navigation bar click Team Calendar.

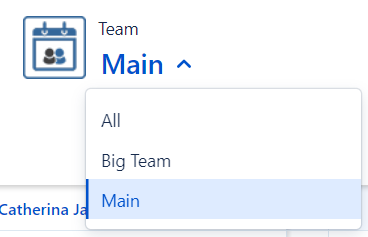
How to switch among teams?
To change the team view click on the currently selected teams's name located on the upper-left corner of the page and select the desired team.
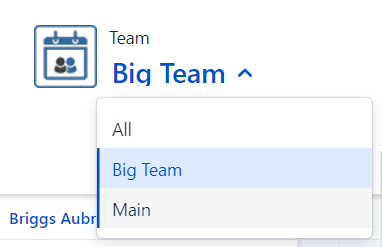
Learn more about team visibility on the General Permissions page.
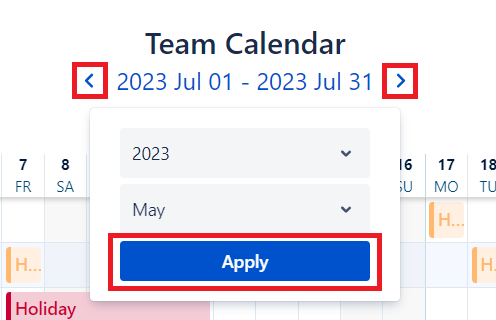
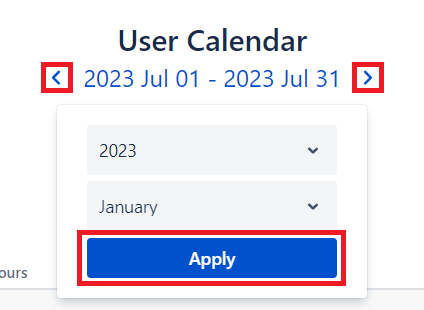
How to switch between monthly views?
Navigation back and forth between monthly views is possible by clicking on the left and right arrows located below the Team Calendar title or by clicking on the current period. In the latter case, select the desired period and click on the Apply button.
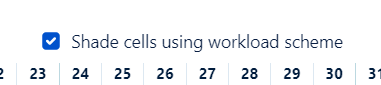
How to shade cells using workload scheme?
By default, weekends are colored according the current user's locale data1. In order to shade cell according to the workload scheme of members, select the Shade cells using workload scheme option located on the upper-right corner of the calendar.
How to manage events?
Learn more about event creation, deletion, etc. on the Calendar Actions page.
In case of Jira addon only.
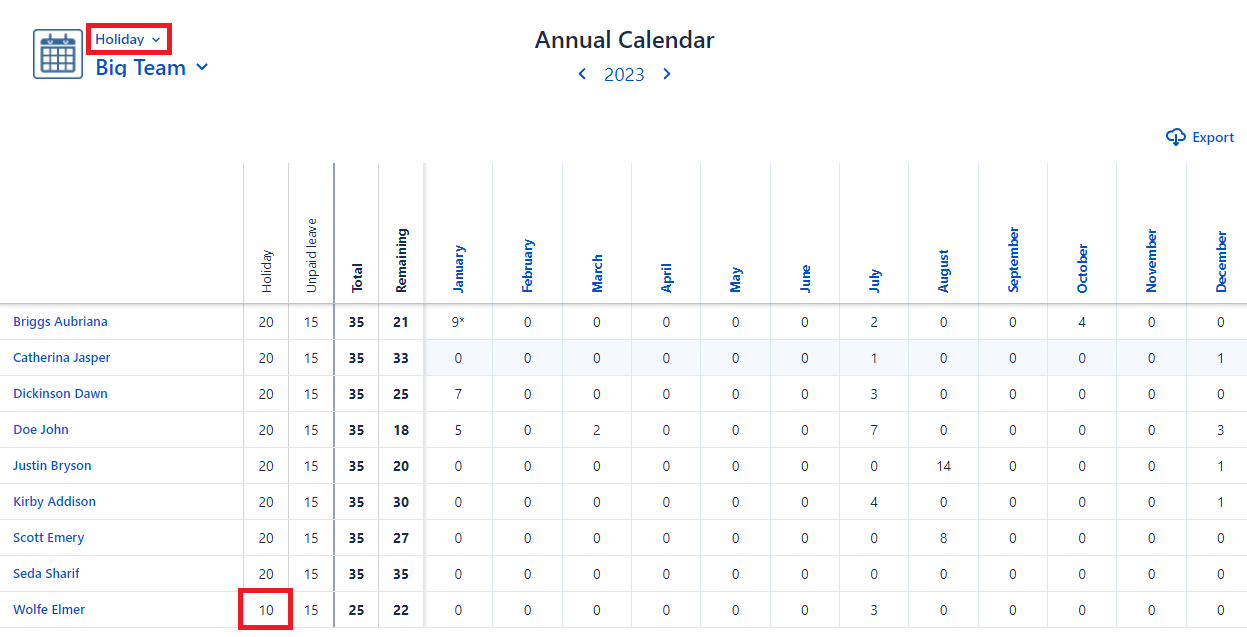
Annual Calendar
The Annual Calendar requires to have at least one active event type. It is accessible to all Team Trax Users. Learn more about calendars' visibility on the General Permissions page.
It provides a yearly, numerical overview of the user's or team's time offs based on the selected event type. If the selected event type has active limits, they will also be displayed.
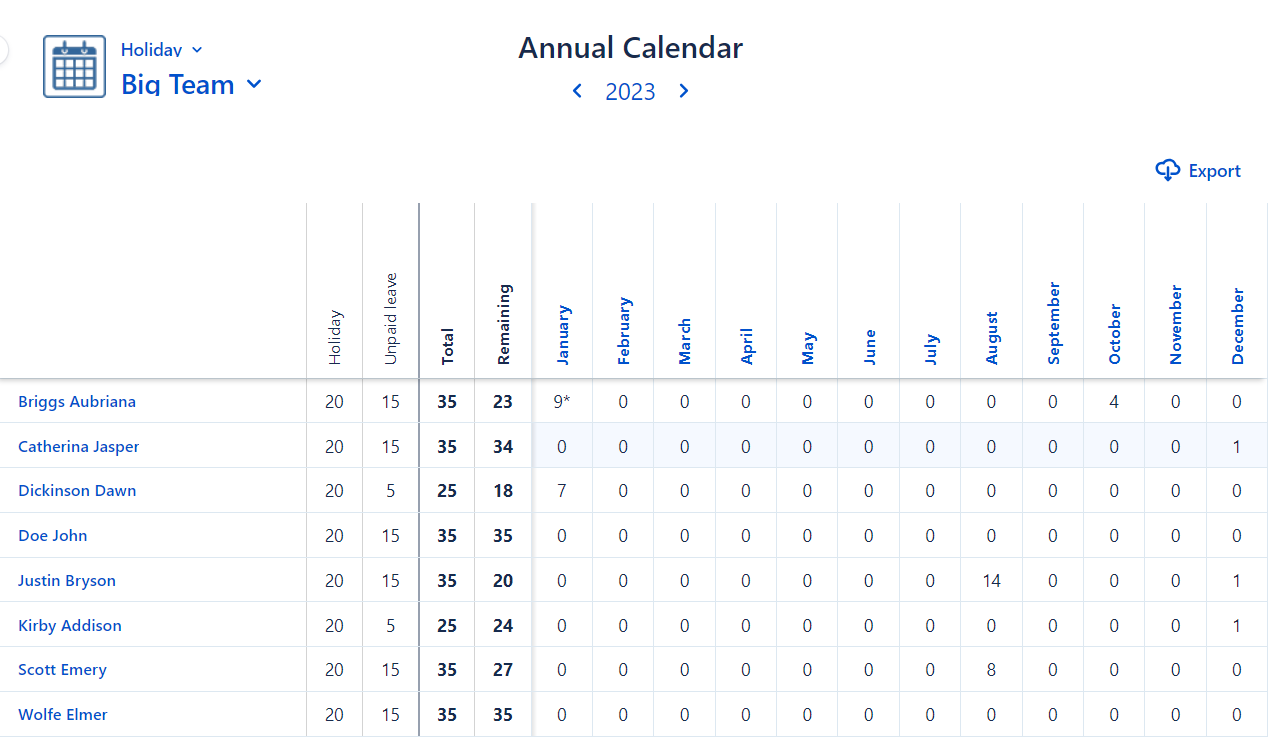
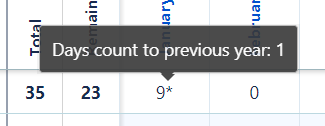
Days remained from previous year
If a user didn't used all of their available days in the previous year and has an overflowing event from the previous year, those days are automatically consumed before deduction from the current year's limit.
It is marked by an asterisk. To see how many days was moved to next year, hover over the marked number in the calendar.
How to access the Annual Calendar?
On the navigation bar click Annual Calendar.

How to switch among teams and event types?
Any event type view can be combined with any team view.
To change the event type view click on the currently selected event type's name located on the upper-left corner of the page.

To change the team view click on the currently selected teams's name located on the upper-left corner of the page (under the selected event type) and select the desired team.

Learn more about team visibility on the General Permissions page.
How to switch between yearly views?
Navigation back and forth between yearly views is possible by clicking on the left and right arrows located below the Annual Calendar title.

How to export calendar data to Excel document?
Calendar can be saved by clicking on the Export button located on the upper-right corner of the calendar.

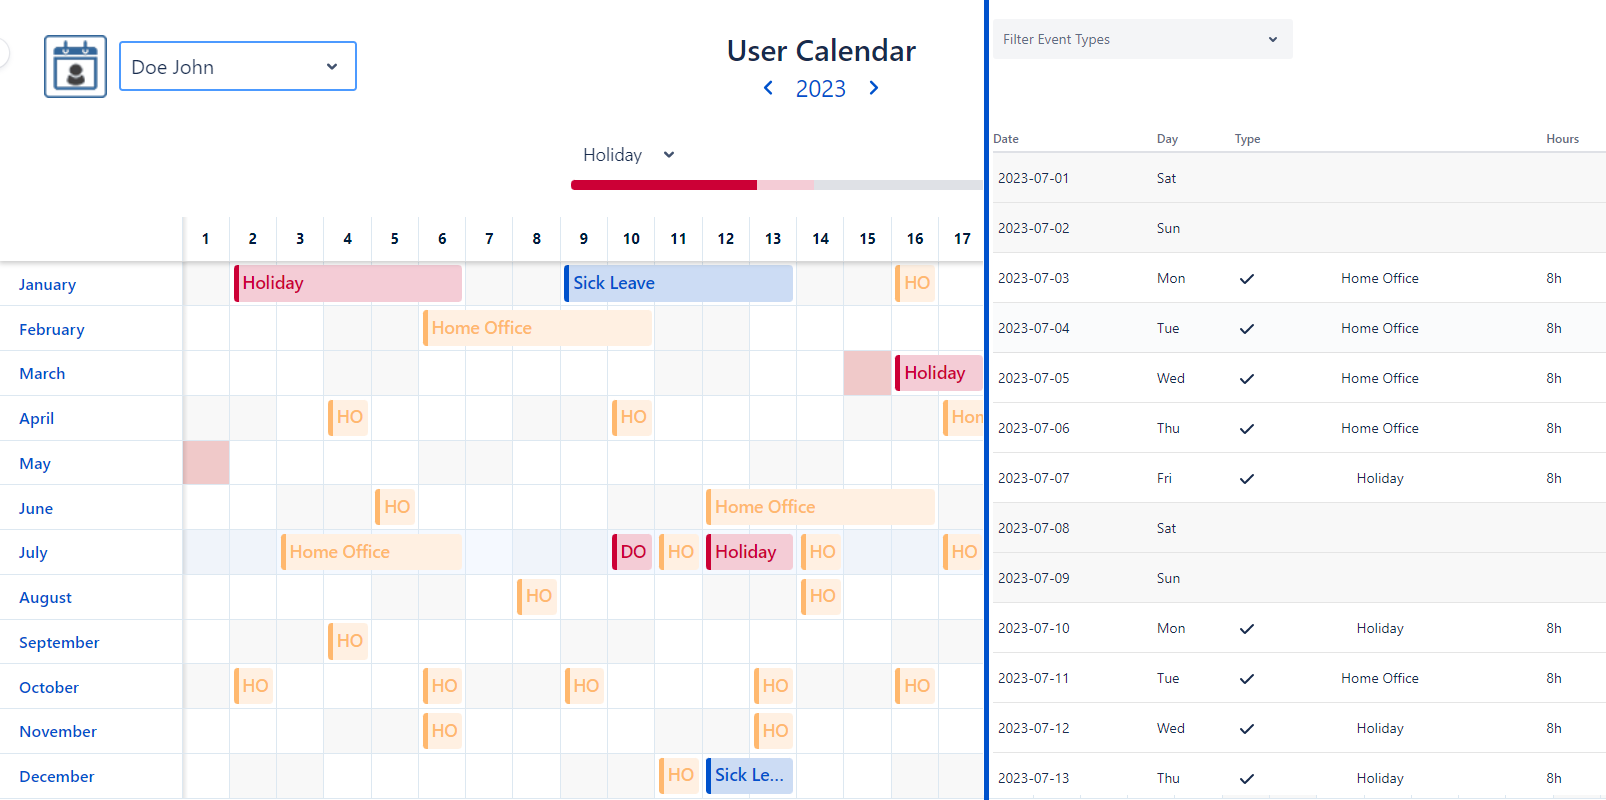
User Calendar
The User Calendar is accessible for any Team Trax User. Learn more about calendars' visibility on the General Permissions page.
It provides yearly and monthly overviews about events of the selected user's (by default, about the current user's).
How to access the User Calendar?
On the navigation bar click User Calendar.
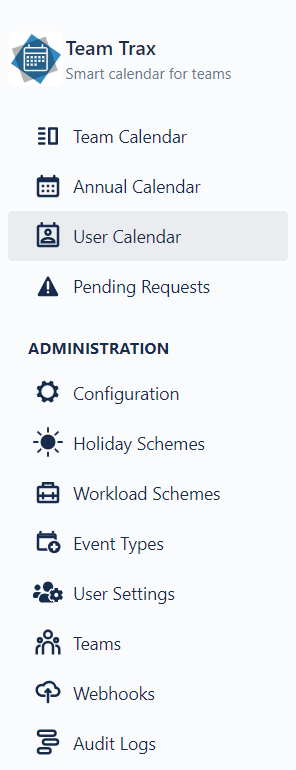
How to switch among users?
To change the user view click on the currently selected user's name located on the upper-left corner of the page and start typing the targeted user's name, then click on the full name when it's appearing in the results.
How to change between annual and monthly view?
To change between the Annual and Monthly view, toggle the corresponding buttons on the upper-right corner of the page.

How to shade cells using workload scheme?
By default, weekends are colored according the current user's locale data1. In order to shade cell according to the workload scheme of the selected user, select the Shade cells using workload scheme option located on the upper-right corner of the calendar.
In case of Jira addon only.
Annual User Calendar

On the yearly view, unapproved events are slightly transparent, meanwhile rejected events are marked by crossed out pattern. Grey cells indicates weekends, red ones indicates Public Holidays and the crossed out cells are invalid dates (e.g. 31 February).
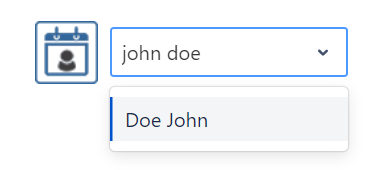
How to switch between yearly views?
Navigation back and forth between yearly views is possible by clicking on the left and right arrows located below the User Calendar title.
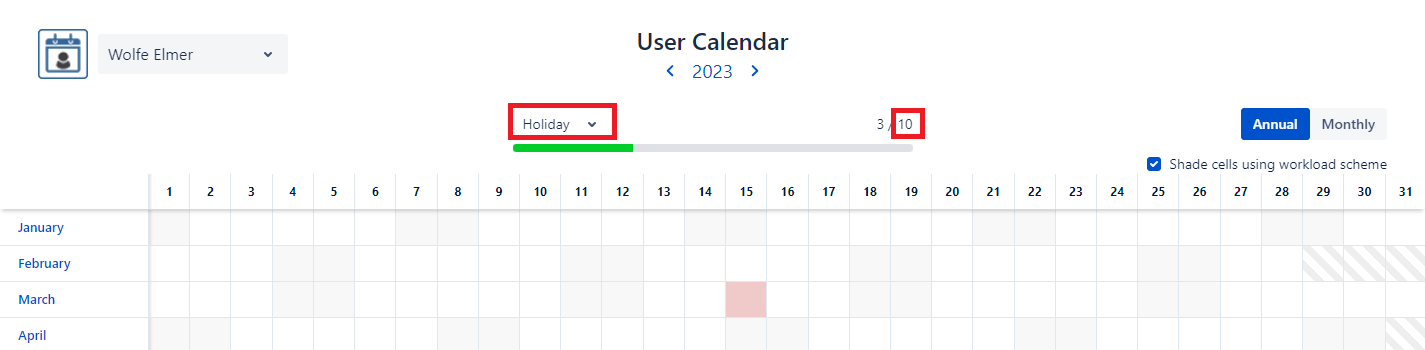
Tracker
![]()
The event type tracker is located right below the displayed year in the User Calendar (annual view only). It shows the amount of days the selected user took of a certain event type. Unapproved events are marked by a fainter color.
Hover over the different parts of the tracker to see the following information:
- Total approved days
- Total days that await approvals
- Remaining days
- Annual limit
The Tracker isn't visible by default. In order to enable this functionality, a default event type should be set on the Configuration page by an Environment (Jira) Administrator.
How to change event type on the tracker?
To change the event type displayed by the tracker, simply click on the current event type's name, then select the desired one from the dropdown.
![]()
How to manage events?
Learn more about event creation, deletion, etc. on the Calendar Actions page.
Monthly User Calendar

On the monthly view, unapproved events are marked by a Recent (small clock) icon, meanwhile approved events are marked by a tick right before the event type name, under the Type column. Rejected events aren't present in this view.
 |  |
|---|---|
| Approved event | Requsted event |
Grey cells indicates weekends, red ones indicates Public Holidays.
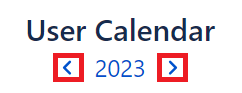
How to filter event types?
To filter displayed event types, simply click on the Filter Event Types dropdown located right below the user selection, on the upper-left corner of the page, and select the desired event types. To reset filters, click the small X icon.
How to switch between monthly views?
Navigation back and forth between monthly views is possible by clicking on the left and right arrows located below the User Calendar title or by clicking on the current period. In the latter case, select the desired period and click on the Apply button.
Total Time
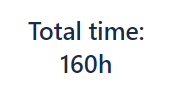
Total time represets the total duration of displayed approved events. It is located right below the monthly view period selection.
How to export calendar data to Excel document?
Calendar can be saved by clicking on the Export button located on the upper-right corner of the calendar.

Note: However the calender doesn't display rejected events, they are present in the exported Excel file.
How to manage events?
Event management is very similar to the General Calendar Event Actions, but the User Calendar monthly view has its own particularities:
Event creation: Events can be created by clicking on the Event Type column on the desired empty row, which represents the start date of the event. When the cursor is hovering over a valid area, a small Edit(crayon) icon appears.

Event modifications: Events can be modified by clicking on the More icon in the corresponding Event Type column. When the cursor is hovering over the valid area, the More icon appears.

Event History: Event history is displayed whenever the current user clicks on the corresponding row of the table (if history is present and the user has permission to see it).
Teams
In order to grant users access to the Team Calendar and User Calendar Team Trax Administrators have to set up Team Trax teams.
A team consists of application users (and/or one or more user groups1).
User can see their teams by clicking on the dropdown at the upper-left corner in their Team or Annual Calendar.
Team Members
Users who are members of the team. They can create events for themself in the Team or User Calendar.
Team Lead
This is a team level permission. The Team Lead get notified by e-mail whenever an event was created, approved or deleted (in case if it was an approved event).
The Team Lead isn't necessarily a member of the team.
Team Approvers
This is a team level permission. The approvers can approve or reject requested events inside their team. They can approve their own event only in case if there is no other approver available at the moment.
Team Approvers get notified by e-mail whenever an event in their team change its status to requested. They can browse all requested events assigned to them in the Pending Request interface.
Team Approvers can't create an event on another user's behalf. Team Approvers aren't necessarily members of the team.
Team visibility
Each team has their visibility level, that can be:
- Public: the team appear visibile for every applicaton user.
- Team: the team appear visibile for members and approvers only (including active substitute approvers). In case of "All Team" view, the user can't see all teams but those they are member of.
- Hidden: the team appear visibile for Team Trax Administrators and Team Lead only.
Team Memberships
Team Members possess memberships in their teams. These memberships can be edited by Team Trax Administrators. A team member appears in the Team Calendar only if they have memmberhip in the specified period.
How to set up a team?
See the Team Configuration page for more details.
Server/Data Center version only
Limits
In Team Trax setting up limits works like to following:
Event type limits
-
Set event type limits to influence the maximum number of event days users can create. This affects every user in your Team Trax instance.
-
To set up event type limits choose Event types on the main menu bar. Then from the event type list, click on Manage Limits on the desired event type to open the limits data sheet.
-
You can read more information on managing event type limits in the Event Type Limits.
User limits
-
Set user limits to manage the maximum number of days on a user basis.
-
To set user limits select Users on the main menu bar. Then type the desired user's name into the user filter then click Manage limits on the user's row.
-
User limits override the event type limit for the given user, so setting a user limit requires you to have an event type limit.
-
You can read more information on managing user limits in the User Limits.
General Permissions
Team Trax User
This is a global permisison, all application user owns it. This grants right to use the User Calendar and the Annual Calendar.
Environment (Jira) Administrator
Grants permission to the Addon Configuration screen. Find out more on the Add-on configuration page.
Team Trax Administrator
This is a global permission. Find out more on the Add-on configuration page.
Team Permissions
These are team level permissions. There are three of them: Team Member, Team Lead, Team Approver. Find out more at the Team page.
Team Visibility
Teams are set to public by default, but Team Trax Administrators can decide to make them team-wide only or private. Find out more at the Team page.
All Team Visibility
By default, the All Team visibility is turned off. It can be changed by Team Trax Administrators on the Configuration page to Public or Team.
Calendar View Permissions
- Team Calendar: visible for users who are members at least in one team (and they have permission to see the team) or the Public All Team View is set or for who are Team Trax Administrators.
- Annual Calendar:
- the team view is visible for users who are members at least in one team (and they have permission to see the team) or the Public All Team View is set or for who are Team Trax Administrators
- own user view is visible for all Team Trax User (in case if they doesn't have any team and doesn't have permission to All Team View)
- User Calendar: visible for all users who possess the Team Trax User permission.
Audit logs and Event History
Audit and Event history logs are visible for users who possess at least one of the following permissions:
Find out more at the Audit logs and the Event History pages.
Pending Requests
This interface is visible only for users who can approve or reject requested events. Find out more at the Approvals page.
Notifications
Since version 1.4.3 we are using Atlassian's email API to get email addresses to send notifications, so it is no longer necessary to set the visibility of email addresses to public.
We are sending notification on the following occasions:
- Event created
- If an events get created and the created event's status is requested, a notification is sent to every approver in the owner's team. An additional notification is sent to the owner of the event, given the creator and the owner are not the same.
- Event changed
- If the modified event was approved or rejected, then two notifications gets sent. Also, if the user who made the changes is not the same as the requesting user, then the requesting user will get a notification as well.
- Event deleted
- A notification is sent when an approved event, that has single approval workflow gets deleted. This email will be sent to every approver in the requesting user's team. The requesting user will also get an email, if the user deleting the event and the requesting user are not the same.
- Worklog overbooked
- We send a notification to the event's owner if he created an event, that has a duration longer, than what their workload scheme allows.
- worklog error
- We send a notification to administrators if there is an error when creating a worklog.
Audit Logs
Every Team Lead, Team Approver and Team Trax Administrator has permission to see Audit logs, located on the sidebar, under Administration.
Audit logs about events are browseable from Team and User Calendar too. Find out more at the Event History page.
The audit logs the users see are based on their role. Team Trax Administrators can see the following modification types for every user in their instance:
- Event
- User Limit
- Event Type
- Team
- Configuration
- Webhook Client
- Webhook Call Team Lead and Team Approvers can only see Event logs for users who are in the same team.
Logs visible for Team Leaders and Team Approvers:
- Event approval
- Event rejection
- Deletion of an approved event
- Event creation on behalf of someone else or if audit log creation for own actions is enabled in the plugin configuration
- Deletion of an event owned by someone else or if audit log creation for own actions is enabled in the plugin configuration
- Event merge on behalf of someone else or if audit log creation for own actions is enabled in the plugin configuration
- Remove days from Event on behalf of someone else or if audit log creation for own actions is enabled in the plugin configuration
Logs visible for Team Trax Administrators:
- Every log visible to Team Leaders and Team Approvers
- Creation, deletion or update operation on a User Limit
- Activation or Deactivation on an Event Type
- Creation, deletion or update operation on an Event Type
- Creation, deletion or update operation on a Team
- Modification of Addon Settings
Logs
An audit log consists of the following attributes:
- Time
- Modified Entity type (Event, User Limit, Event Type, Team, Configuration, Webhook Client, Webhook Call)
- Modificaton Type (Create, Update, Delete, Success, Error)
- User who has made the modification (if present)
- More details about the change (Entity name/Targeted user)
- Change sets (in case of Update modification type)
Change sets
Change sets contains further information associated to logs with Update modification type. They have the following attributes:
- Entity Type of the sub change
- Modification Type (Action) of the sub change
- Name of the updated field
- Old Value: the previously stored data
- New Value: the newly stored data (the concrete modification)
Searching for logs
Audit logs can be filtered in order to easily find the desired information.

"Search logs" field
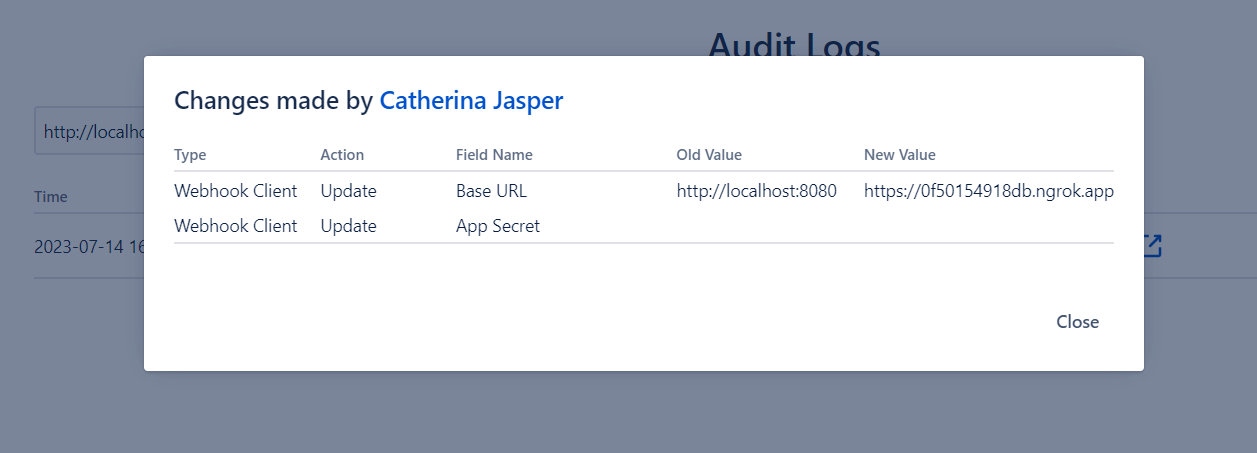
Filter logs by typing either an Entity Name, an Old Value or a New Value.
Example: The user wants to see webhook logs where the old or new value was http://localhost:8080.
Therefore they have to type the desired URL into the field, then click to the Shortcut icon located in the changes column.

A modal will appear that contains the searched change.
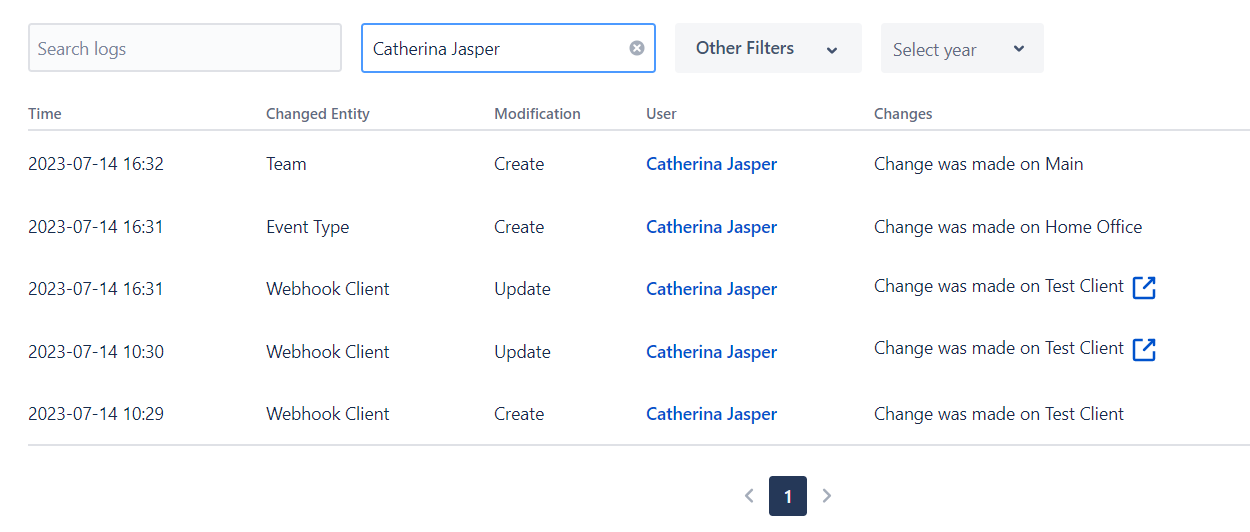
"Search for user" field
Select a user to show such logs that are related to that user only. User name can be present in User, Field Name, Old Value or New Value columns.
Example: The user wants to see logs related to Catherina Jasper.
So they have to start typing that user's name into the field, then have to click on the name that appears in the results.
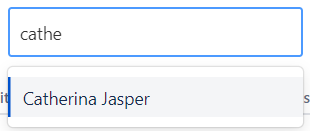
The logs table will refresh so the desired rows will be showned only.
"Other Filters" field
User can search for specific Changed Entity Type(s) and/or Modification Type(s).
Example: The user wants to see such logs that are related to Event Type entities and Updated modficitaions.
To achieve this, they have to click on the Other Filters dropdown, then click again on the Event Type and Update options.

The logs table will refresh so the desired rows will be showned only.

Date filter fields
Filter logs by year or more specifically by month with the date filter fields.
Example: The user wants to see logs that have been created in July 2023.
Therefore the user have click on the Select Year dropdown and select 2023.
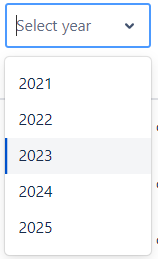
Then the Select Month field will appear. To filter the results further, they have to click the Select Month dropdown and select the desired month.

The logs table will refresh so the desired rows will be showned only.

Approvals
Setting up workflows
Event approvals are using workflow schemes, which you can add to an event type upon creation. Currently there are 2 options you can set when creating an event type.
- No Workflow
- Single Approval Workflow
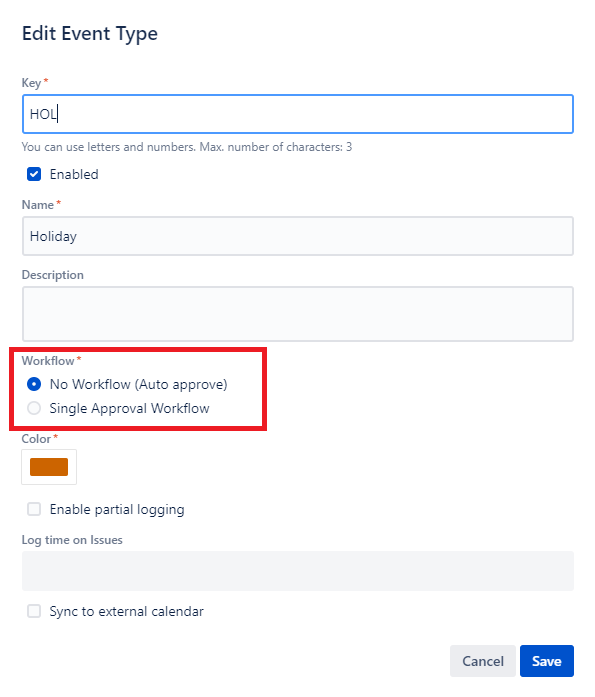
Setting up approval workflow
When No Approval Workflow is applied to an event type, requested events with that type will be automatically approved. When approval process is set to Single Approval Workflow, created events must be approved manually by a user with approving permission.
Adding approvers to a team
Approving permissions are granted only to Approvers and Substitute Approvers. You can add Approver roles to users from the Teams page.

Setting approvers - step 1

Setting approvers - step 2
Adding substitute approvers to a team
Substitute Approvers are selected by Approvers to fulfill their duties while they are not available. Substitute approvers are set on the event creation page. Substitute approvers can only approve events for the duration of the event they are set in. After that, these roles will be revoked.

Setting substitute approvers
You can manage a requested event's status from the Team Calendar, User Calendar and the Pending Requests pages.
Pending Requests
The pending requests page provides a place to manage event requests in an efficient and user-friendly way. You can only approve those requests, whose owners are in the same team as you.
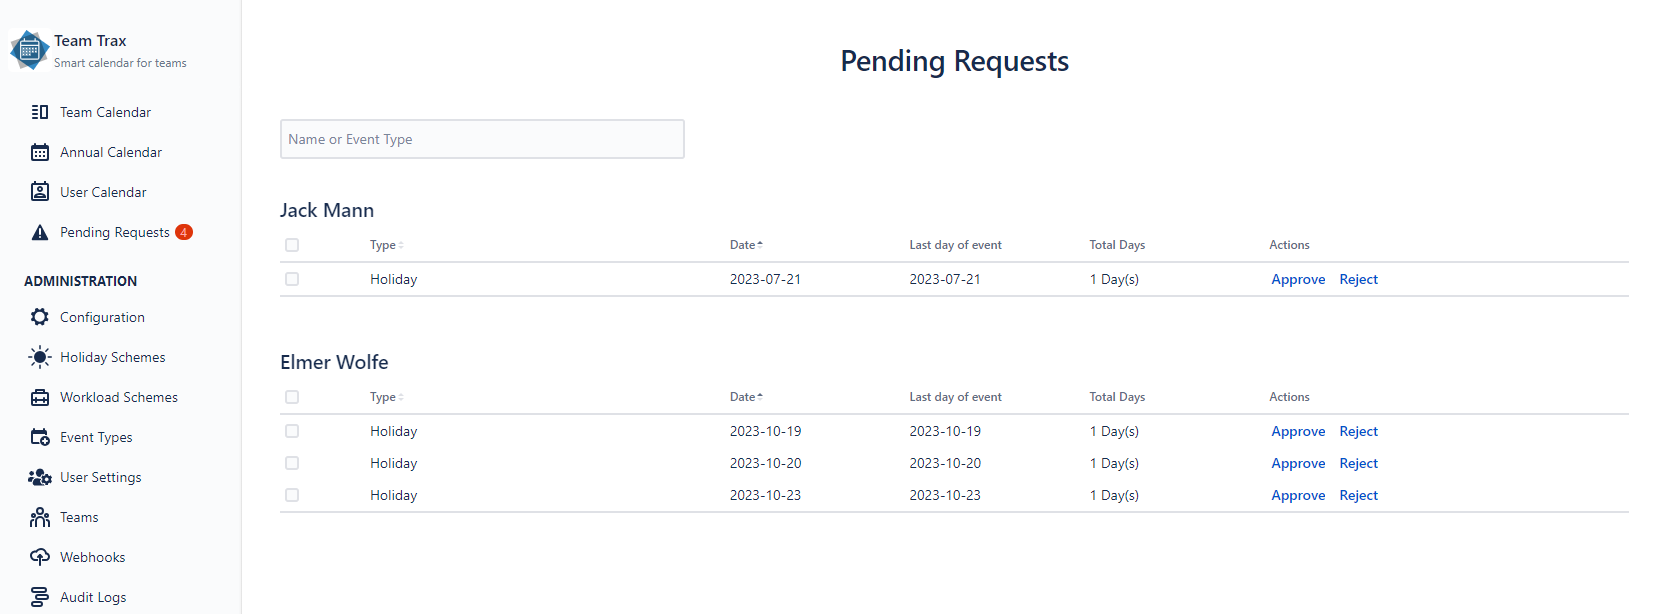
Pending Requests view
Accessing
Provided you have an approver role in any team, the page can be accessed from the sidebar beneath the calendars.

Pending Requests accessing
You might see a badge next to the Pending Requests sidebar option. That badge shows the number of requests waiting for approval. The counter periodically updates, so no need to frequently check the page for new requests.
Managing requests
When you enter the page, the requests grouped by names will be listed. You can filter the list by typing in the search bar. You can filter for user names or event type names. You can also sort the requests for each user by clicking on the table headers. You can sort by event type name or start date.
You can approve requests individually by clicking the Approve or Reject buttons in the request's row, or select multiple requests by clicking the checkbox in their rows, then press the Approve all or Reject all button in the top-right corner of the page.
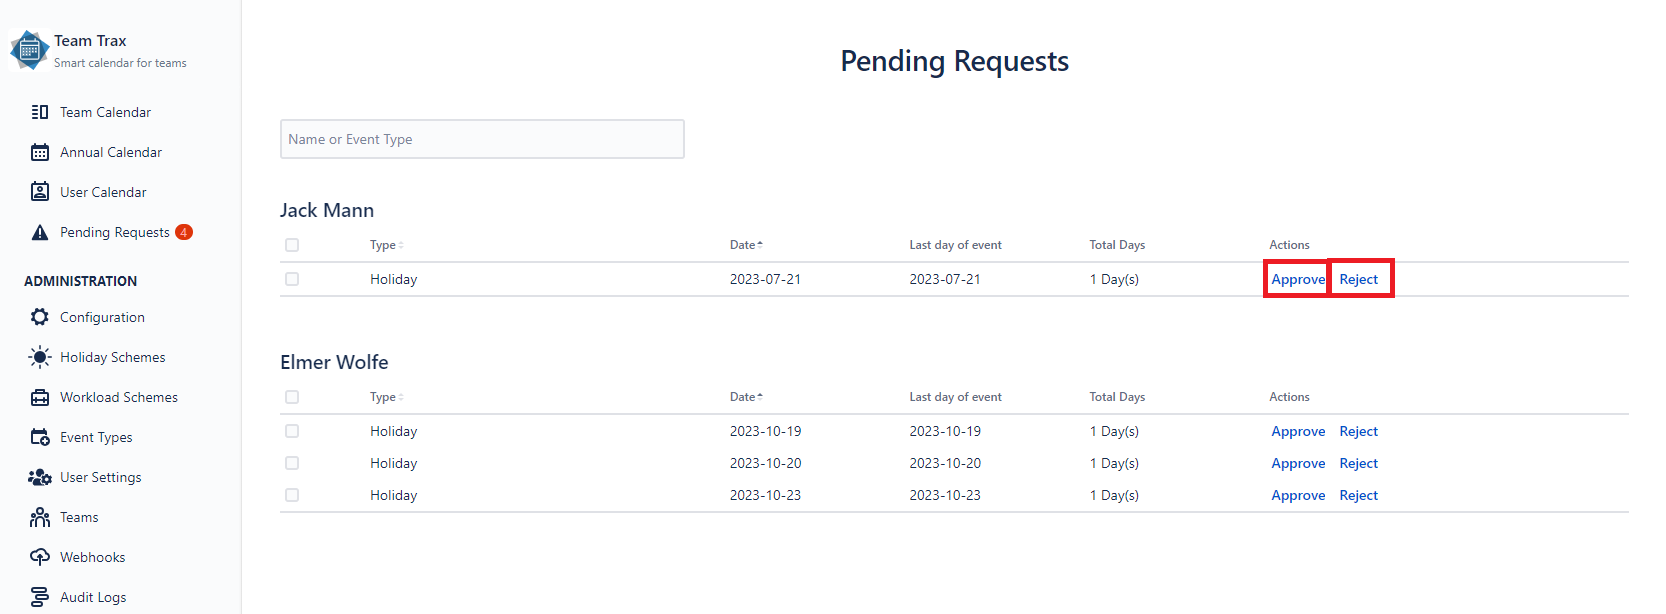
Managing requests individually

Managing multiple requests
Substitute Approvers
Substitute approvers become full-rights approvers during the day of the event so that they also can see the Pending Request interface and get e-mail notifications about newly requested events.
They also gain permission to see teams where the original event owner has Team Approver permission.
How to set a substitute approver?
During event creation or editing, start typing the name of the targeted employee into the substitute field, then click on the full name when it's appearing in the results.
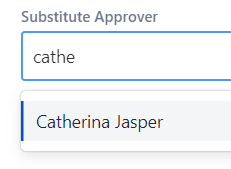
After saving the event, the selected employee gain approver permission for the duration of the event.
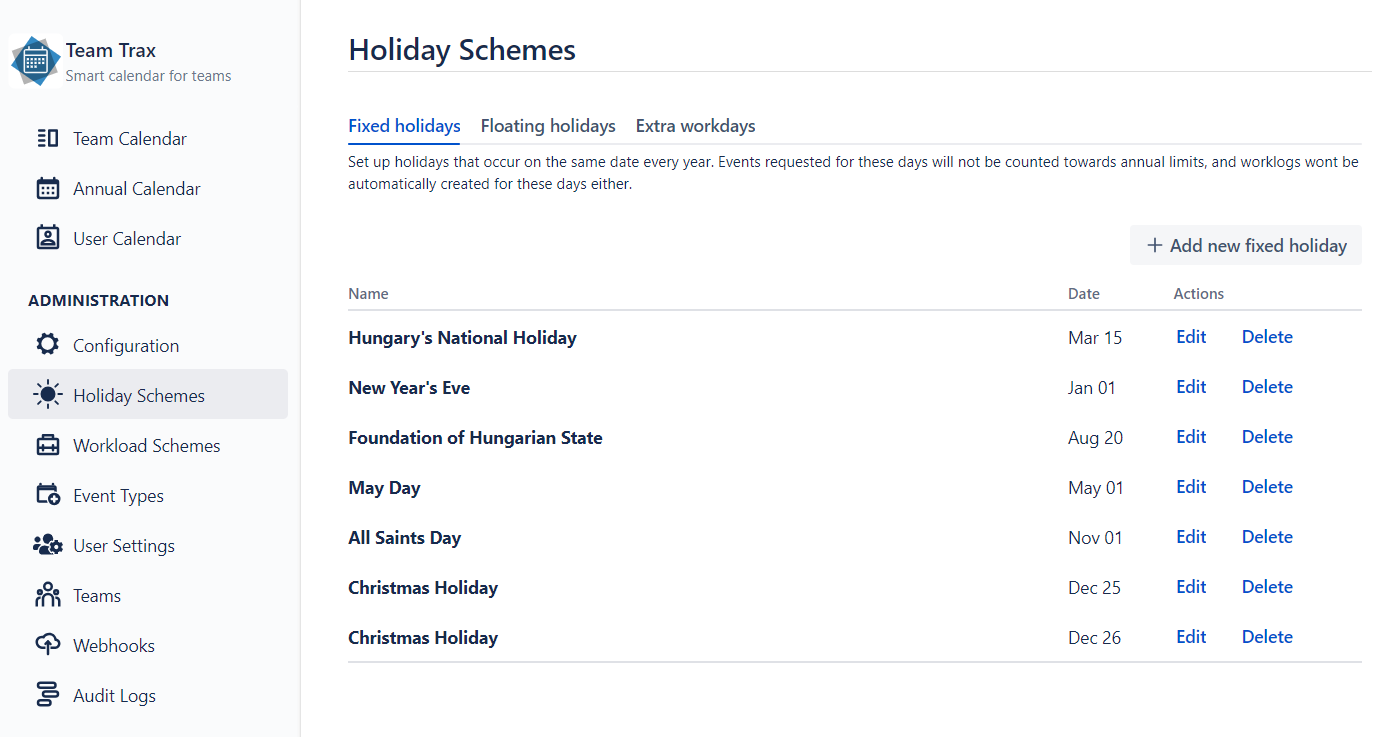
Holiday Schemes
By configuring Holiday Schemes you can modify the default calendar setting. You can add extra rest days and extra workdays too, which affect to the worklog. You can create multiple holiday schemes for handling holidays internationally.
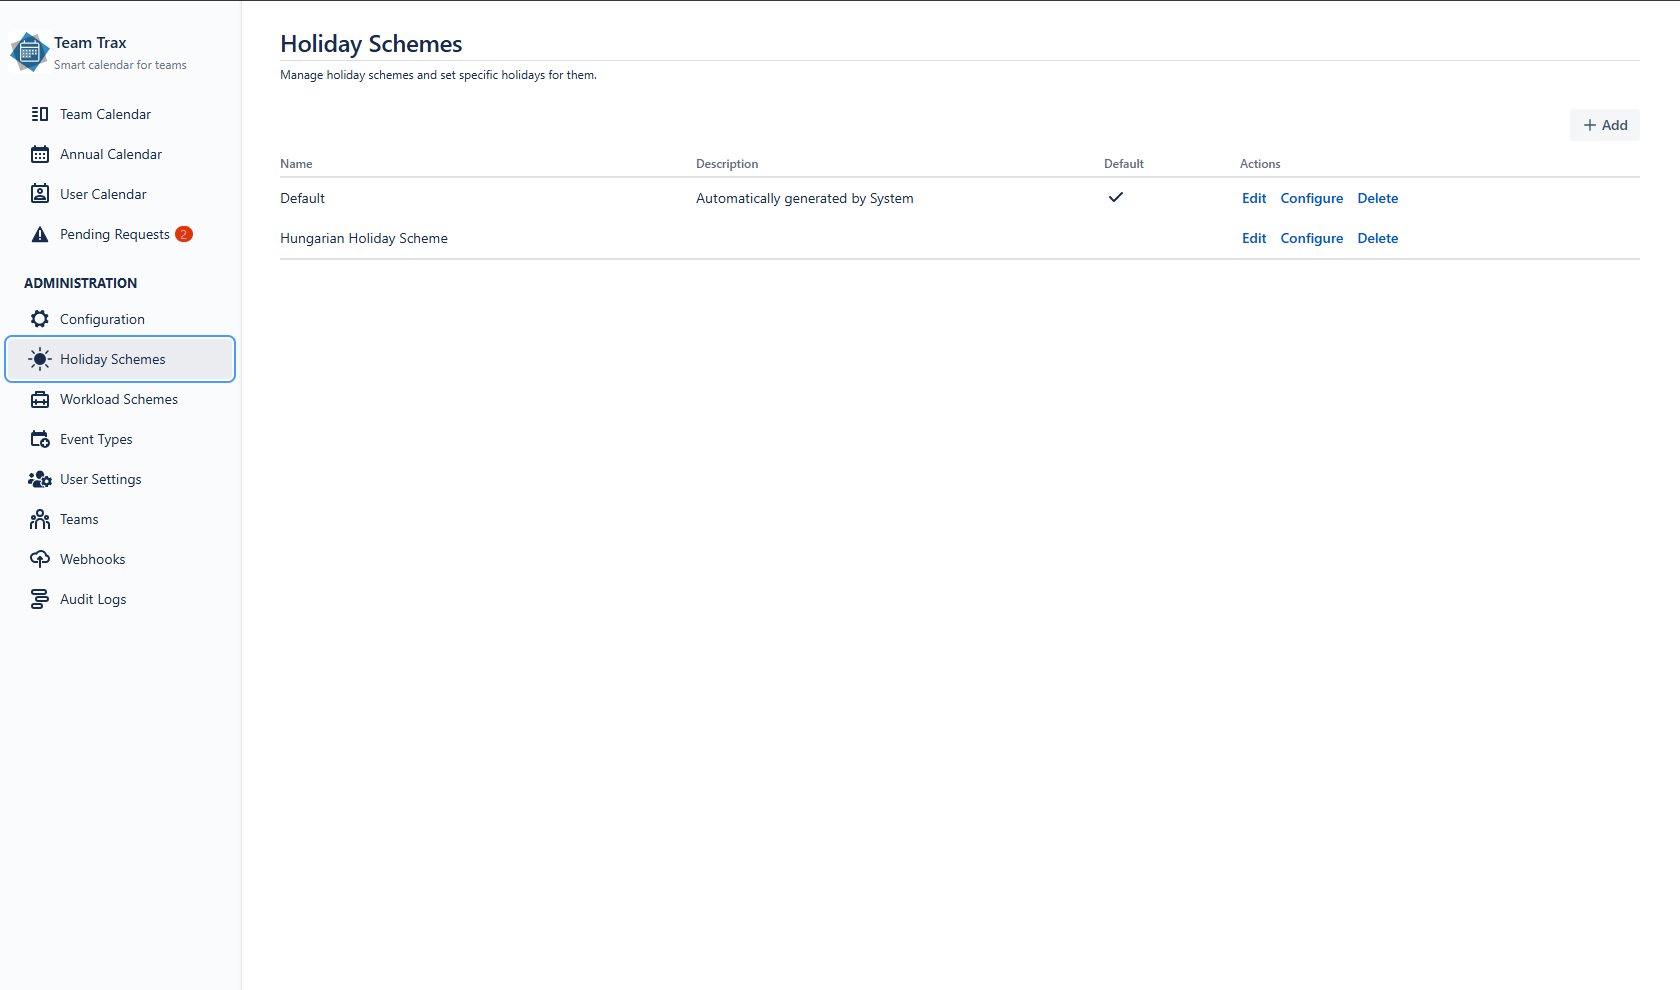
The exceptional days categorized into three types:
- Fixed holiday: holiday that occurs on the same date every year
- Floating holiday: holiday that occurs only a single time or on different days from year to year
- Extra workday: workday which is normally not a workday
You can set holidays and extra workdays for a holiday scheme by clicking on the Configure button. Whenever you update a holiday in an existing scheme, future events affected by the change will be updated accordingly.
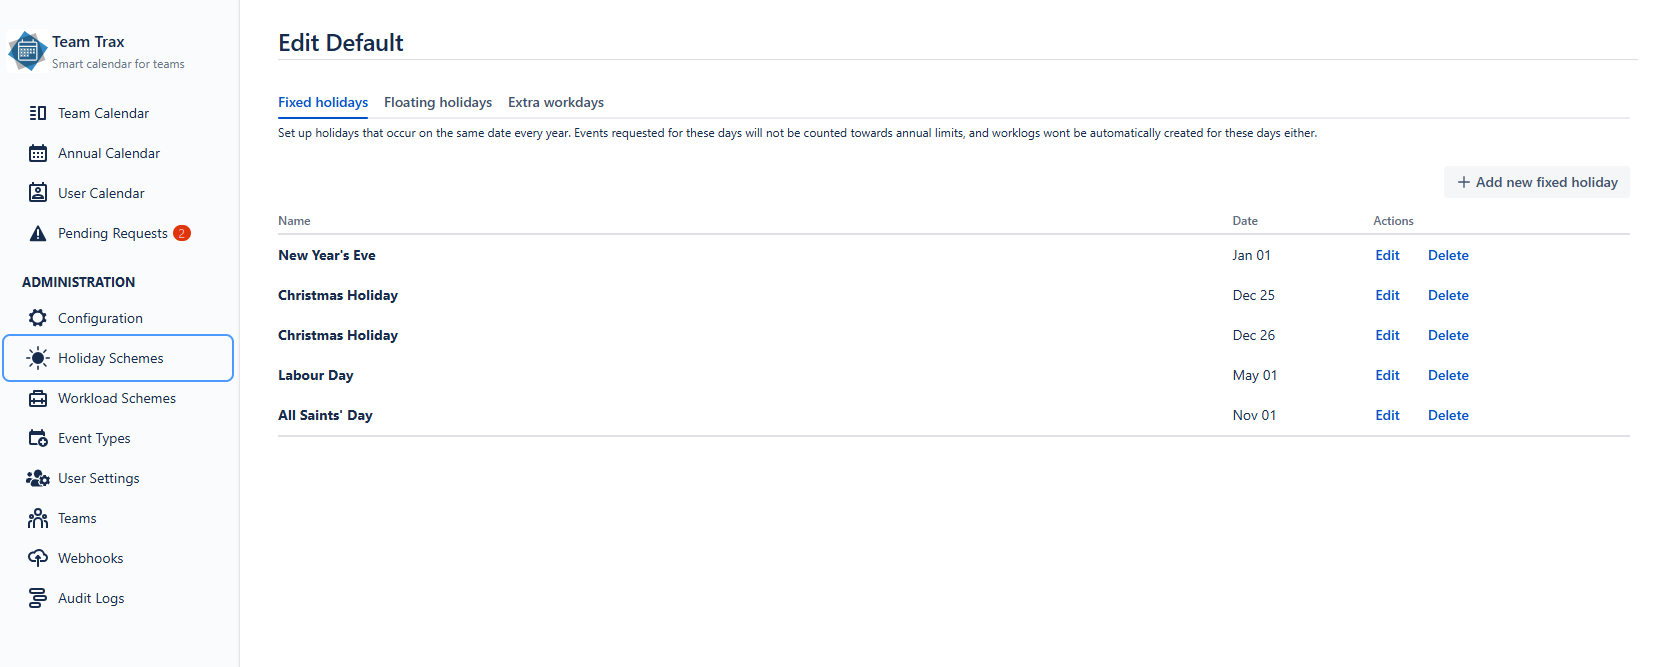
Fixed Holidays
As Team Trax Administrator for the Team Trax you can set up Fixed holidays which occur on the same date every year. Events requested for these days will not be counted towards user limits and worklogs won't be automatically created for these days either.
From the Holiday Schemes page select the Fixed holidays tab first. After that, holidays will be listed.

How to create fixed holidays?
You can simply create a new holiday entry by clicking the Add new fixed holiday button on the upper-right corner.

In the appearing modal please fill in the required data.

Please Note: Only one holiday / extra workday per day is permitted.
The configured holidays are editable and removable in the future.
Floating Holidays
As Team Trax Administrator for the Team Trax you can set up Floating holidays which occur only a single time or on different days from year to year. Events requested for these days will not be counted towards user limits and worklogs won't be automatically created for these days either.
From the Holiday Schemes page select the Floating holidays tab first. After that, holidays will be listed. By default a filter for the current year will be applied which can be changed.
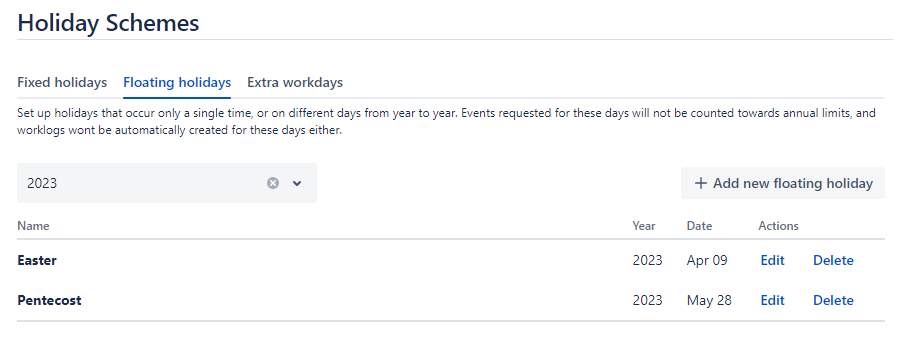
How to create floating holidays?
You can simply create a new holiday entry by clicking the Add new floating holiday button on the upper-right corner.

In the appearing modal please fill in the required data.
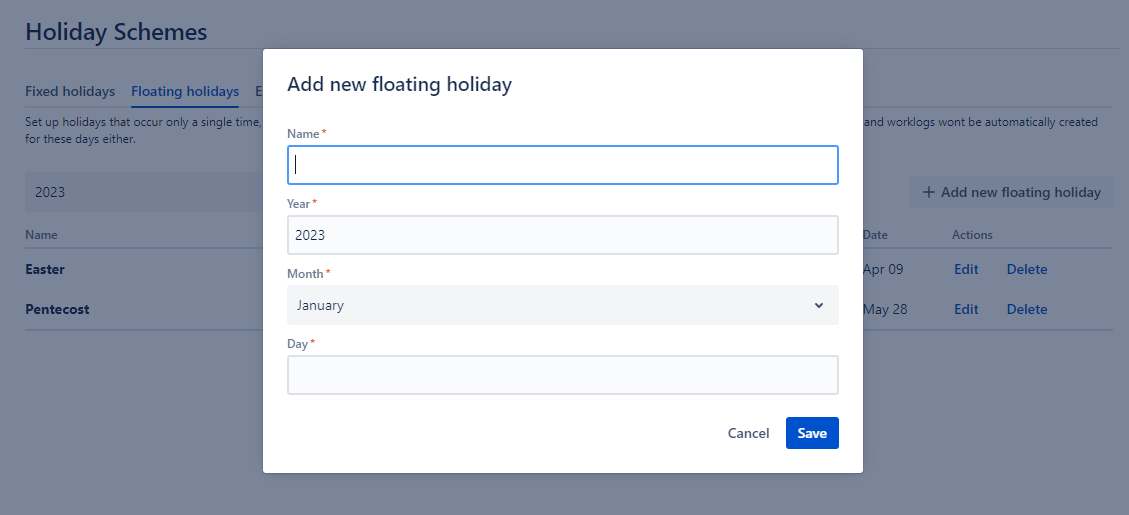
Please Note: Only one holiday / extra workday per day is permitted.
The configured holidays are editable and removable in the future.
Extra Workdays
As Team Trax Administrator for the Team Trax you can set up Extra workdays which are normally not a workday. Events requested for these days will be counted towards user limits and worklogs will be automatically created for these days, like normal workdays.
From the Holiday Schemes page select the Extra workdays tab first. After that, extra workdays will be listed. By default a filter for the current year will be applied which can be changed.

How to create extra workdays?
You can simply create a new extra workday by clicking the Add new extra workday button on the upper-right corner.

In the appearing modal please fill in the required data. Extra workday entries unlike other holiday entries, have an additional field named Workday reference. This field means which day of a regular workday corresponds to the extra workday. It is considered during limit calculations and worklogs too.

Please Note: Only one holiday / extra workday per day is permitted.
The configured extra workdays are editable and removable in the future.
Workload Schemes
Workload schemes describe what users' weeks look like. When events are created, the resulting worklogs depend on the user's workload scheme.
By default, every Team Trax instance comes with a configured workload scheme. New users will be automatically added to the scheme labeled as Default.

Workload scheme labeled as Default
Accessing
You can access this page by clicking on Workload Schemes in the sidebar under ADMINISTRATION. You must have administrator rights to access this content.

Accessing Workload Schemes view
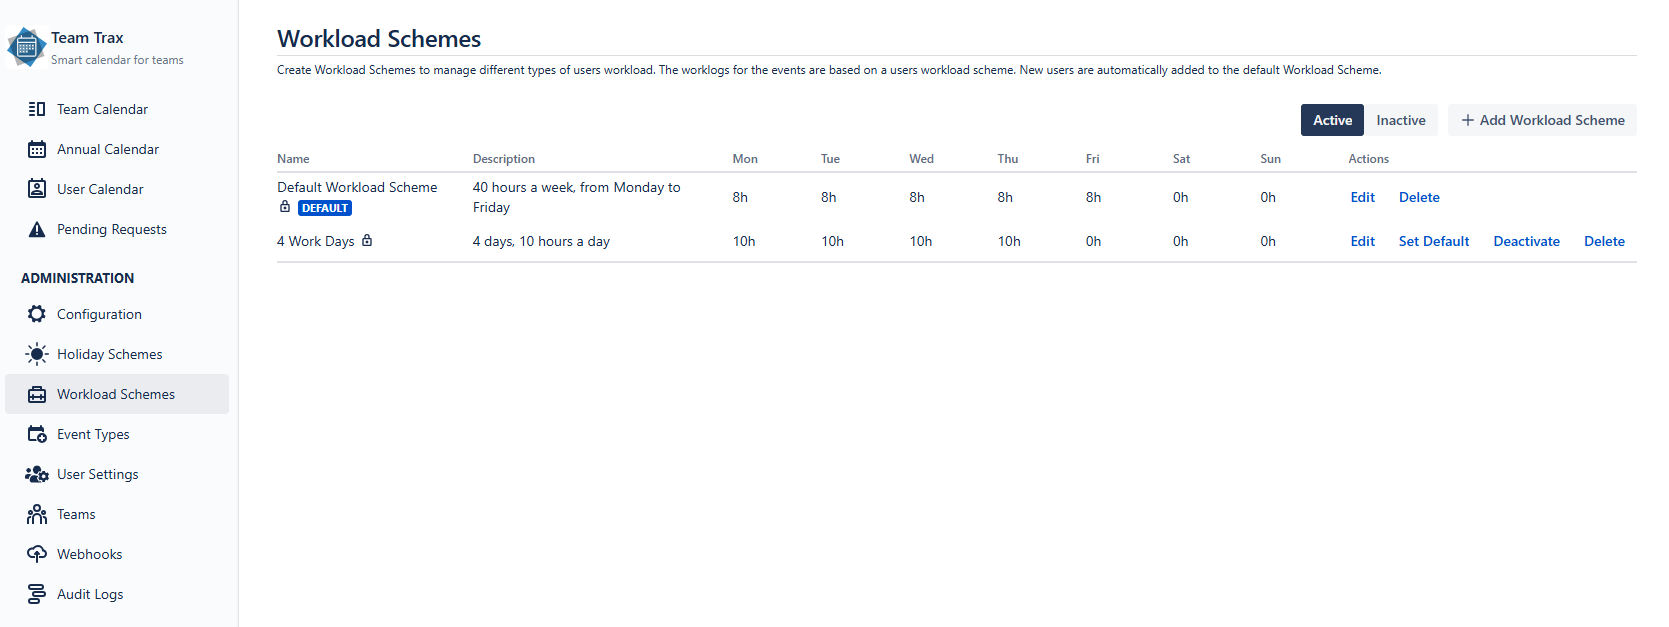
Workload Schemes view
Adding workload schemes
You can add a new workload scheme by clicking the Add Workload Scheme button in the top-right corner of the view. Clicking it opens a form.

Adding new workload scheme
You only need to set a name and the workload for each day, then press Save. Workloads can be entered using any of the following formats:
Both of the following are equivalent:
- 6h30m
- 6.5h
Likewise, both of the following equal 6 hours of workload:
- 6h
- 6
Managing members' workload schemes
Members' workload schemes are managed on the User Settings page.
Please note that when you change workload schemes, the durations of future events will change and worklogs for those events will be updated.
Add member to workload scheme

Adding members to workload scheme - step 1
Adding members to workload scheme - step 2
Update members' previous workload schemes
Updating workload scheme of a member - step 1
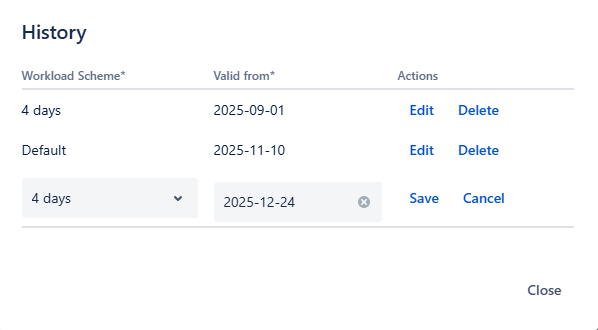
Updating workload scheme of a member - step 2
Event Types
Event types help you describe events that are similar. You can set up events for these types, which will label the events on the calendars and applies options set on the event type to events.
- JIRA Administrator
- Team Trax Administrator
If you do not have any of the required roles above, you will not be able to access the page.
Accessing
On the sidebar under ADMINISTARTION, click Event Types.

Accessing Event Types
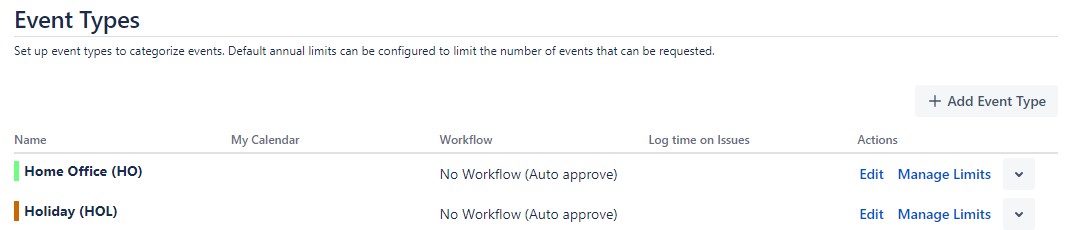
Event Types view
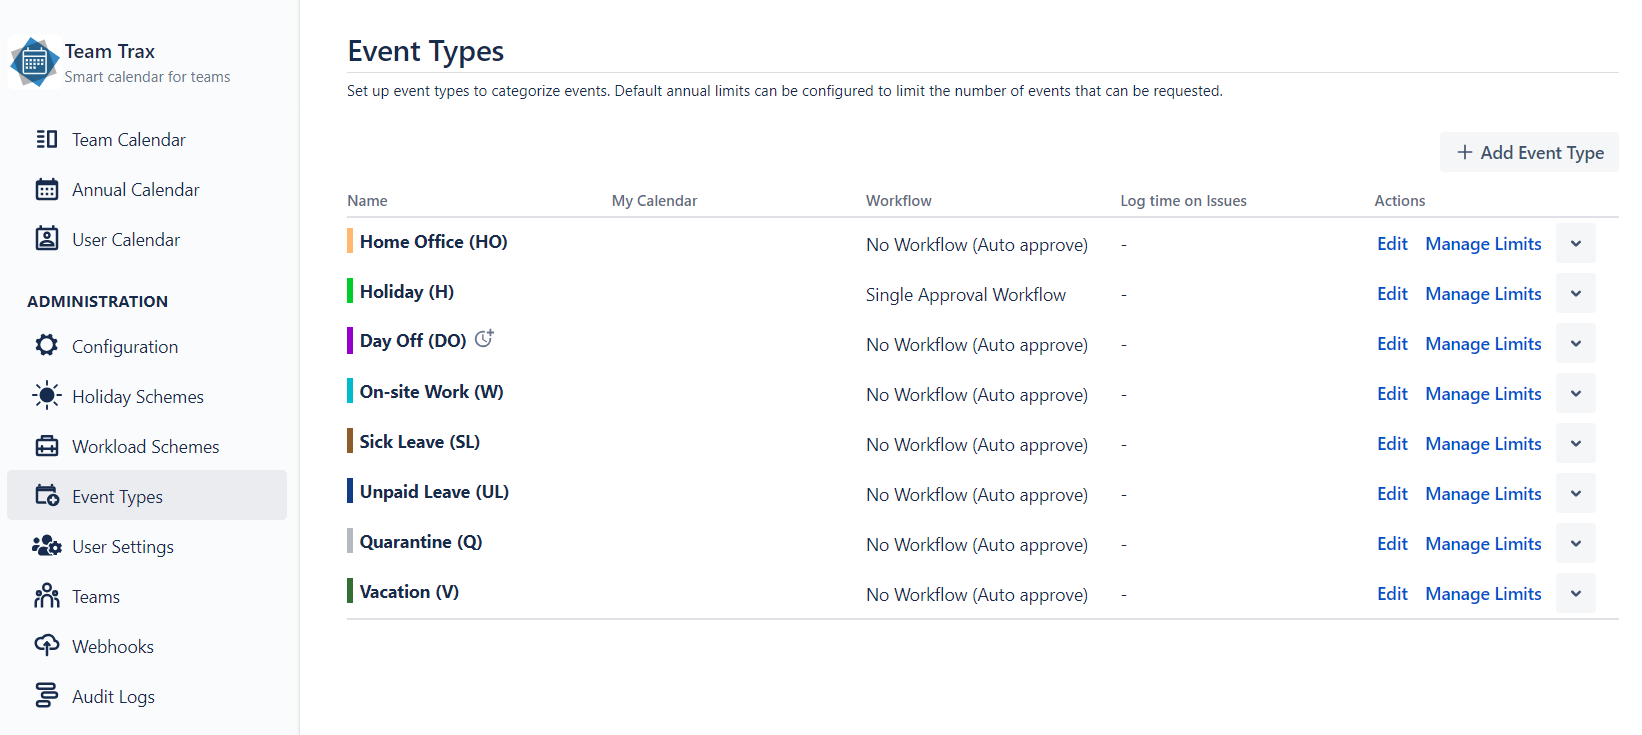
Upon entering the Event Types page, you will see all of your event types in your Team Trax instance (or none if your instance is new) in a list.
Event type view
Each Event Type has these informations displayed
- The Name column contains the full name and key of the Event Type.
- My Calendar contains a marker for event types that are synced to an external calendar.
- Workflow columns have workflow schemes which decide how an event should become approved.
- The Log time on Issues contain JIRA tickets on what events with the Event Type should log.
Also every entry in the list has an Actions section, which contains the possible operations we can perform on an Event Type.
These are
- Edit
- Manage Limits
- Deactivate
- Delete
Create Event Type
Above the list there is a button labeled "Add Event Type" which when clicked, opens a form, as shown in the image below:
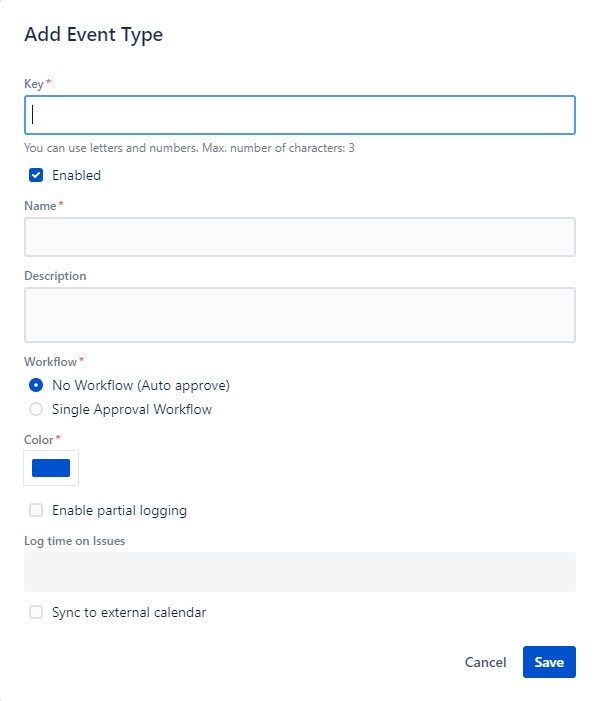
Event type create form
On this form you can create your own Event Types, which then can be used throughout your Team Trax instance. To create an event type, you will have to fill out all mandatory options. The form consists of the following inputs:
| Option | Mandatory | Description |
|---|---|---|
| Key | Yes | A short identifier of the event type, maximum 3 characters, letters and numbers. |
| Enabled | No | Toggles whether the event type can be selected by events, or be tracked by users. |
| Name | Yes | Full name of the event type. |
| Description | No | Extra information about the event type. |
| Workflow | Yes | Toggles whether events using this type are automatically approved or has to be done manually by an approver. |
| Color | Yes | Sets the label color for events that use this type. |
| Enable partial logging | No | Enabling this will let users create events with fractured duration |
| Allow users to modify past approved events | No | When enabled, users will be able to modify approved events that happened in the past. This option is only visible if Single Approval Workflow is checked. |
| Log time on issues | No | Sets what JIRA Issues should events log on. |
| Sync to external calendar | No | Toggles if the event type should synchronize to an external calendar. For more information, see External Calendar settings. |
Edit Event Type
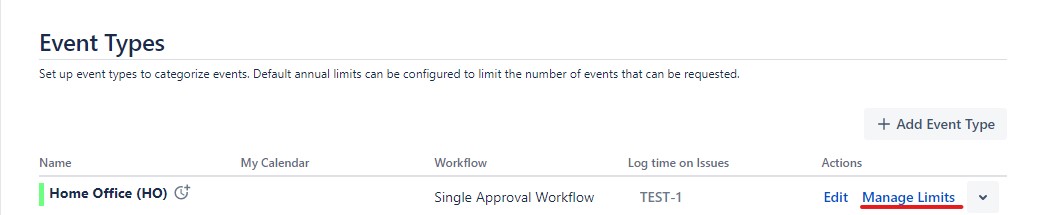
You can edit an Event Type by clicking the Edit button in the Event Type's row.

Event type edit form
Delete Event Type
Deleting an event type will entirely remove the type from Team Trax. You can not remove an event type until every events related to that type are deleted. You can delete an event type by clicking on the Delete option on the dropdown.
Deactivate Event Type
Deactivating disables the event type until it is reactivated. While deactivated, you can not track the event type and you can not set up events with that type. Existing events using that event type will remain on the calendars.
Set limits on Event Types
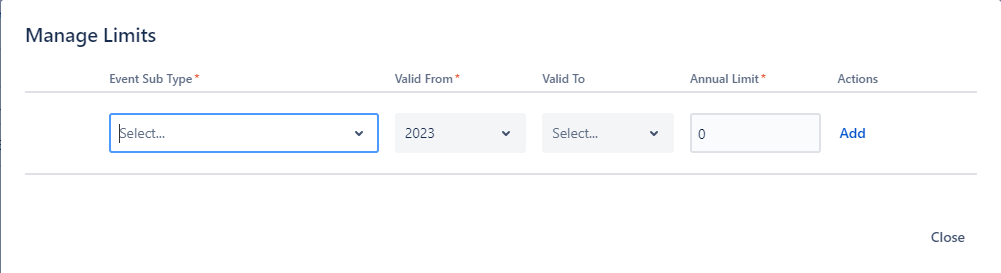
After you have created an event type, you may specify annual limits for that event type, which will set an upper-boundary on how many events you can set up with that type in the given year. You may spacify multiple limits for an event type, which will add up on the limit calculation. You can read more information on managing event type limits in the Event Type Limits documentation.
Event Type Limits
After an event type has been created, you can set annual limits on them. You can personalize these later.
On the main menu bar choose Event types. Then from the event type list, click on Manage Limits on the desired event type to open the limits data sheet.
The following page will appear:
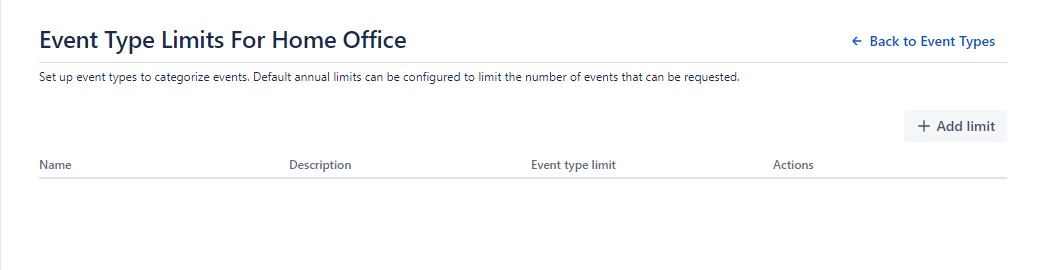
You can add a new limit entry by clicking Add limit on the top-right corner of the page. When clicked, the event type limit form will open.
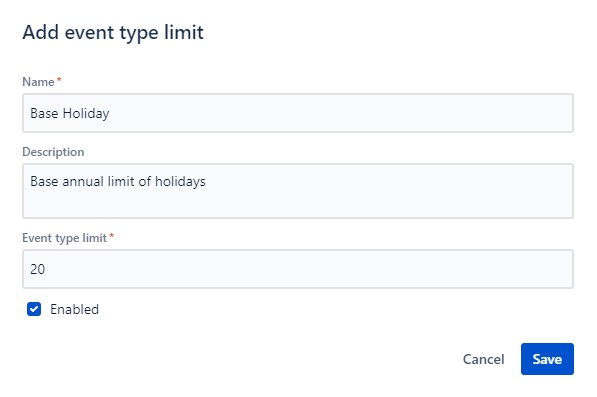
You have to provide a name and the number of days when creating an event type limit. The number of days can be provided as an integer or a fraction, up to 2 decimal places.
Enabling the new Annual Limit:
- You can make the Event type's Annual limit available to all users as soon as it has been created by checking the Enabled checkbox.
- You can leave the checkbox unchecked to hide it for further configuration.
- You can enable or disable the Annual limit directly from the Event type limits view, by clicking the Activate/Deactivate link at the end of the Annual limits list.
After event type limits have been set up, they will show up on:
- Annual Calendar, when the corresponding event type is selected in the Event Type selector

- User Calendar, when the corresponding event type is selected on the tracker, or configured in the configuration page

User Settings
On the User Settings administration page you can manage the event limits, holiday schemes and workload schemes of the users.
You can access this page by clicking User settings under Administration on the sidebar.
User Settings page access
The User Settings page will open.

User Settings view
Then start typing in the desired user's full name into the search bar. If you have users with the searched name, they will be listed below.
Clicking the ... icon in the Actions column of the user's row will give the following options:
-
Manage users' event limits
- Here you can override event type limits for the given user. You can read more about managing user limits in the User Limits.
-
Change users' workload schemes
- You can assign the user to a different workload scheme or update past workload schemes. More information on Workload Schemes can be read here: Workload Schemes. Please note that by changing a users' workload scheme, future events and worklogs will be updated to use the updated scheme. Events in the past won't be updated.
-
Change users' holiday scheme
- You can update the holiday scheme used by the given user. You can read more about holiday schemes here: Holiday Schemes. Please note that by changing a users' holiday scheme, future events and worklogs will be updated to use the updated scheme. Events in the past won't be updated.
Limits
You may want to specify different limits on a user basis, which you are able to do with user limits.
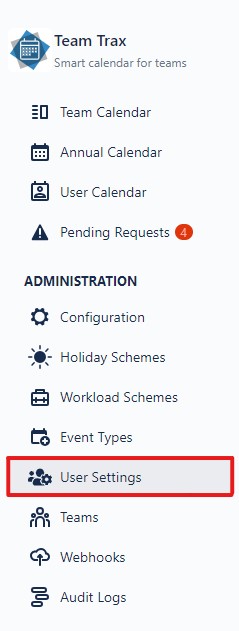
To set user limits select User Settings on the sidebar.

User Settings page access
The User Settings page will open.
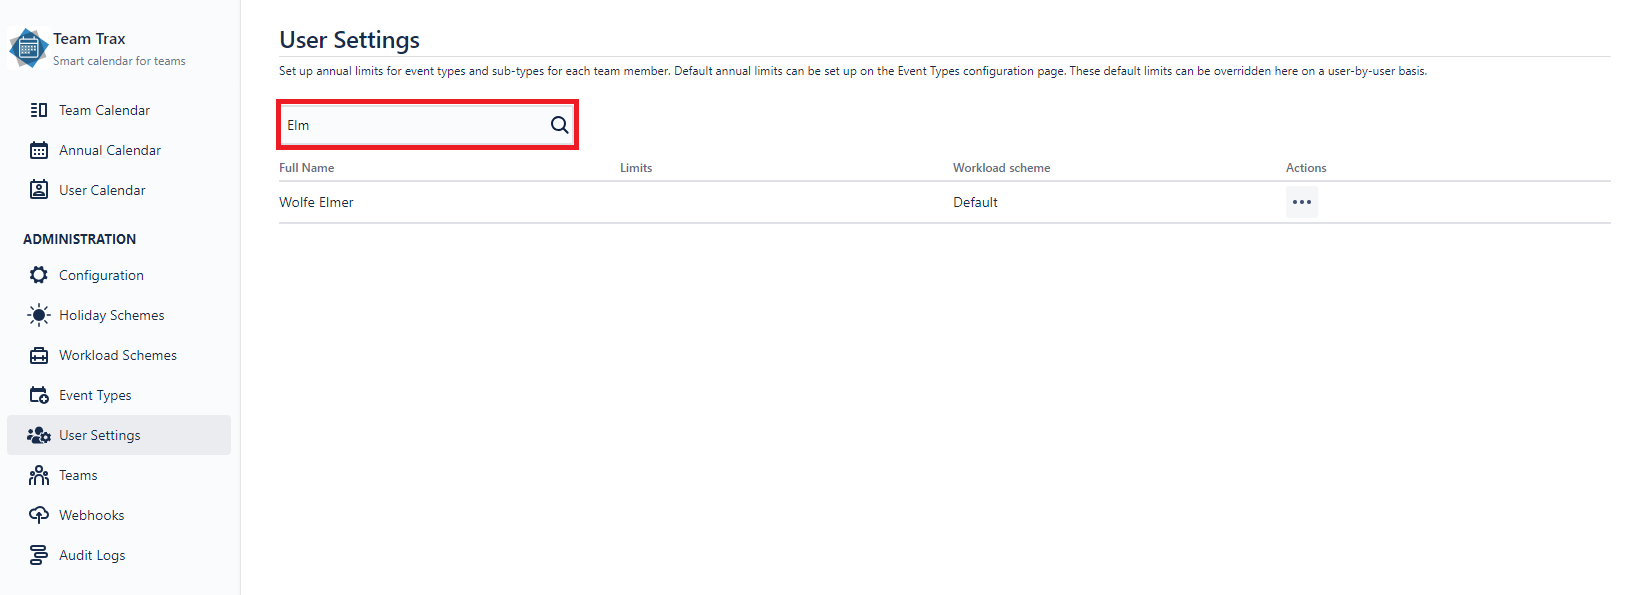
User Settings view
Then start typing in the desired user's full name into the search bar. If you have users with the searched name, they will be listed below.
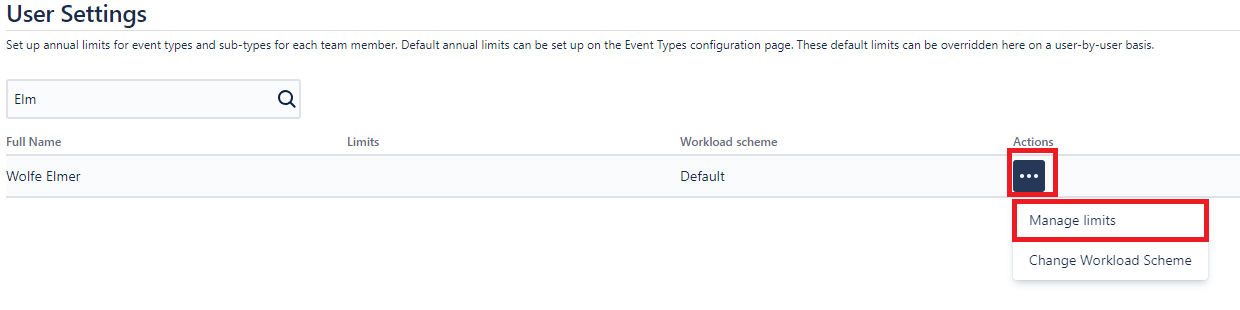
You can add a new limit entry by clicking the ... icon on the Actions column of the user's row, then click on Manage Limits.
User Limit form access
When clicked, the user limit form will open.
User Limit form
On the form you will have to provide an event type limit, a validity period and the limit you would like to set for the user.
User limits override the event type limits, so setting a user limit requires you to have an event type limit. If you do not set an end date for the period, the limit override for the user will be permanent. The limit can be provided as an integer or a fraction, up to 2 decimal places.
You can set multiple user limits for an event type limit, but they can not overlap each other.
After user limits have been set up, they will show up on:
- Annual Calendar, when the corresponding event type is selected in the Event Type selector
- User Calendar, when the corresponding event type is selected on the tracker, or configured in the configuration page
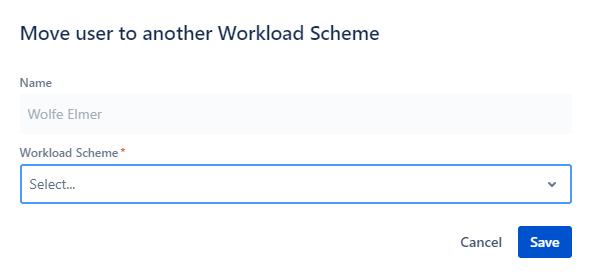
Workload Scheme
By default users will be assigned to the workload marked with a label, however you can also add users to other workload schemes in the User Settings page.
You may access this page by clicking User settings under Administration on the sidebar.
User Settings page access
The User Settings page will open.

User Settings view
Then start typing in the desired user's full name into the search bar. If you have users with the searched name, they will be listed below.
You can change the workload of the user by clicking the ... icon on the Actions column of the user's row, then click on Change Workload Scheme.

Workload scheme move form access
Then, the workload move form will be presented.

Select the workload scheme you would like your user to be in, and press save.
Please note, that changing workload scheme might affect future events' duration. Past event duration will not change after the move.
Team Configuration
The Team Trax Administrator permission is required to be able to set up user teams.
How to set up or edit a team?
On the navigation bar click Teams.
The list of Team Trax Teams will open.
To create a new Team Trax Team, simply click on the Add new team button in the upper-right corner in the Teams view. To edit an existing team, click on the Edit button under Actions.
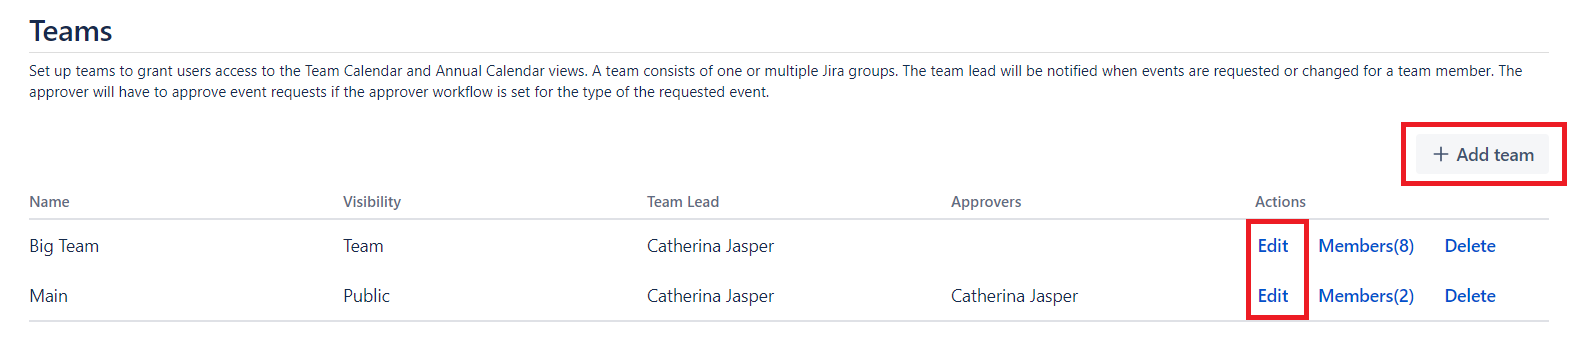
Fill in the required data in the appearing modal. The Members field is visible during team creation only. The required fields are marked by an asterisk. Multiple members and approvers can be selected, but there could be only one leader in the team.
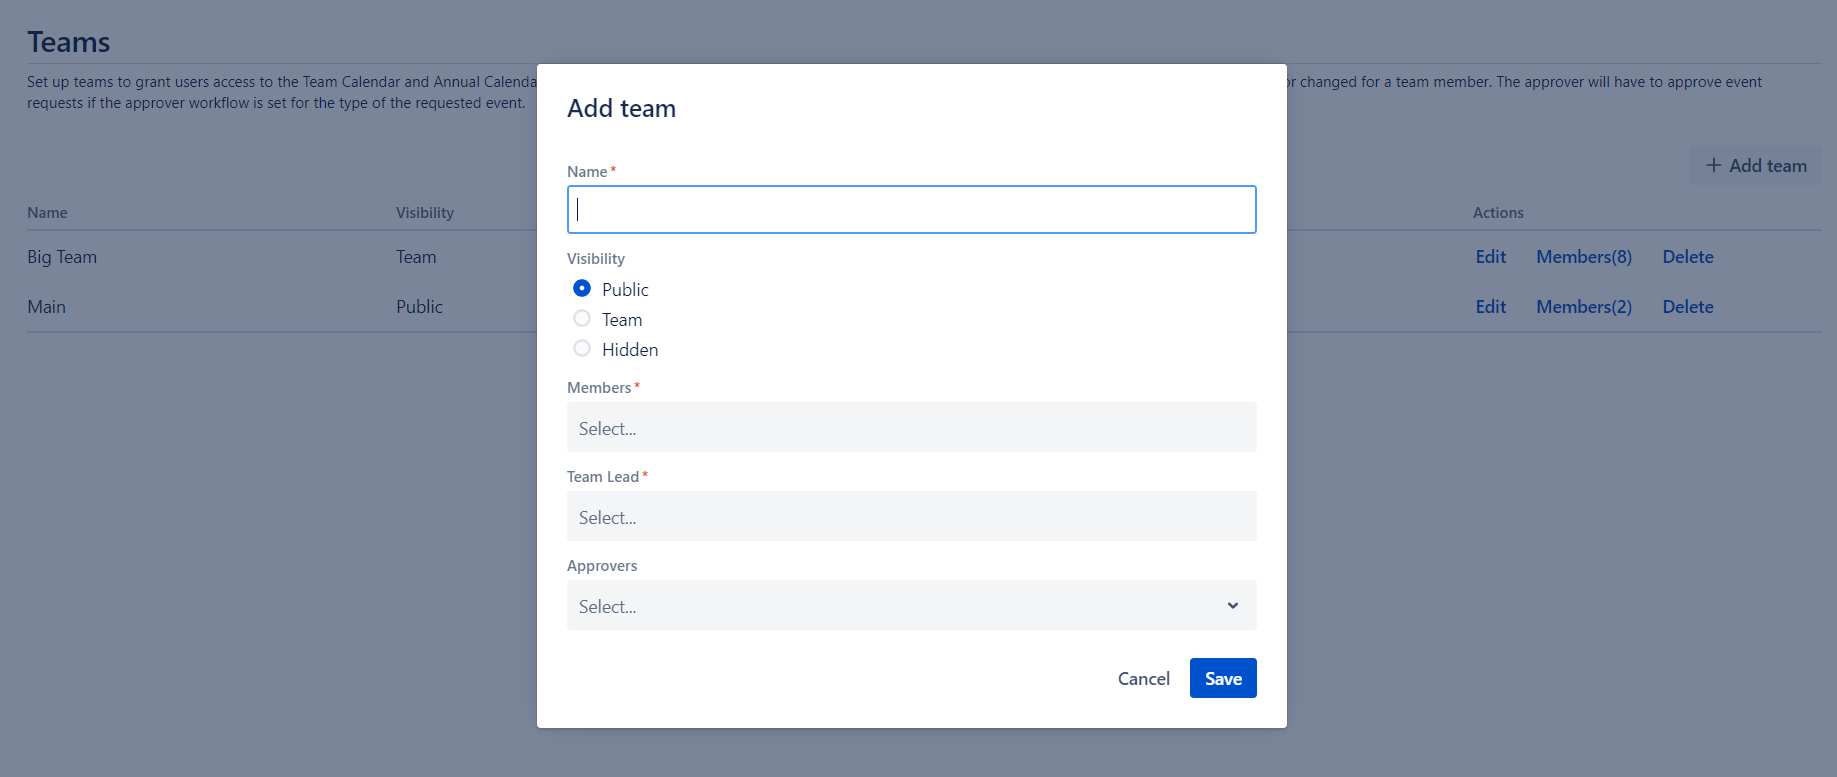
Click the Save button when done.

How to delete a team?
On the list of Team Trax Teams, find the desired team and click on the Delete button.
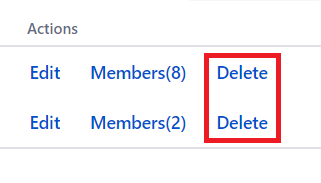
A confirmation modal will be showned, click on the Delete button again.

How to manage team members?
On the list of Team Trax Teams, find the desired team and click on the Members button.
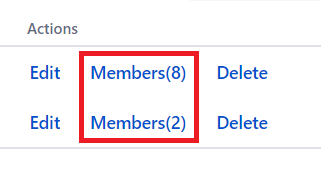
The list of Team Members will open.

To add a new members to the team, simply start typing their names into the Choose user/group field, then click on the Add button.
Members can be removed from team by clicking on the Leave Team button under Actions.
How to search for users in team?
To look up for a particular user, start typing their name into the search field located directly under the Choose user/group field.

The list will refresh so the desired member will be showned only. Delete text from the input field to see all members again.
How to manage memberships of a team member?
In order to appear in the Team Calendar and Annual Calendar, the user needs to own a membership that is covers (fully or partially) the specified period.
The membership management was introduced for that reason, so the employees can easily create events in the past too.
On the list of Teams, find the targeted team and click on the Members button.
A list will open with all members with active membership in the team.
To change between the Active and Inactive members, toggle the corresponding buttons on the upper-right corner of the page.

Members can be removed from the on the Active interface by clicking on the Leave Team button, meanwhile inactive members can be reinstated to team on Inactive intarface by clicking on the Reinstate button under Actions.
| Removing member on Active view | Add member on Inactive view |
|---|---|
 |  |
How to modify membership periods?
Either on Active or Inactive view, find the targeted user and click on Edit memberships button under Actions.

A modal will open with all existing membership record (inside the team) of the selected employee. To make modifications (edit or delete) on them, click the appropriate button under Actions.
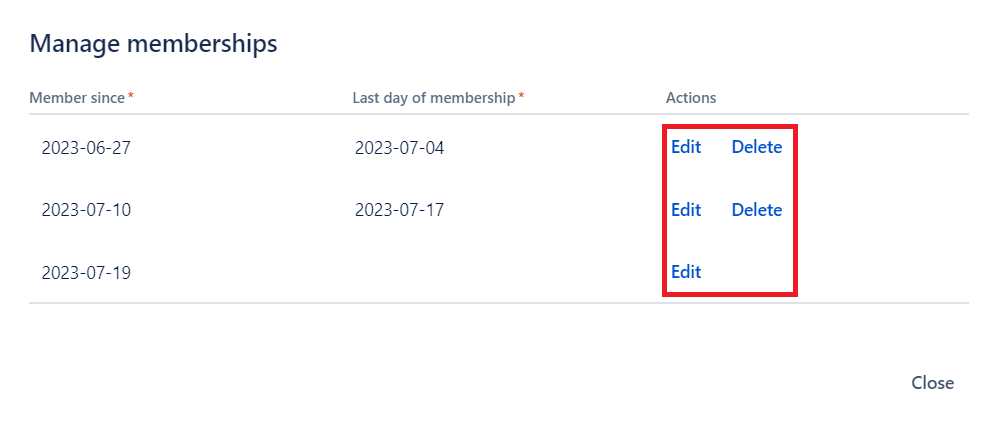
Note: Membership width no end date means a currently active membership.
To modify a membership period, click on the desired date picker field in editing mode, select the new date, then click the Save button.

Note: The end date of the last membership isn't a required field. In case of an inactive member, it can be emptied. When saved, the member will be automatically reainstated to the team.
Date Interval Restrictions
In editing mode, there are some rules that are applied to date pickers:
- membership periods can't overlap
- membership can't be saved with emptied date pickers (except end date of the last membership)
- user must set valid intervals (start date is before end date, or is the same day)
- start date must be set:
- after the end date of the previous membership (if present) or
to the end date of the previous membership (if present) - before the end date of the current membership (if set), but at most to the start date of the next membership (if present)
- to the current date at most
- after the end date of the previous membership (if present) or
- end date must be set:
- after the start date of the current membership (if set), but at least to the end date of the previous membership (if present)
- before the start date of the next membership (if present) or
to the start date of the next membership (if present) - to the current date at most (if next membership exists with a start date that is set to the current date)
- before the current date if next membership doesn't exist
Introducing Webhooks
As Team Trax Administrator for the Team Trax you can set up webhooks to synchronize Team Trax data to external systems. Connecting Team Trax to other services is easy and convenient, since with webhooks you can connect to any supported external systems without hassle.
In this section you'll learn what a webhook is, what they are capable of in our system and how to create and manage one.
What is a webhook?
Webhooks are internet adresses (callback adresses or endpoints) you can send your request and data to when specific events happen, where you can process the given data as you need.
How to create a webhook?
Required permissions
- You need to be a JIRA Administrator or a Team Trax Administrator
If you do not have access to the Team Trax’s Administration options, contact your Team Trax or JIRA Administrator.
Procedure
On the side navigation bar click Webhooks under ADMINISTRATION section.

After that the list of Webhook Clients opens.
Webhook Clients
Access details of external systems can be set up by creating webhook clients. Webhooks can be configured by adding them to webhook clients.
Webhook Clients are listed on this page.

Adding new webhook client
To create a new webhook client simply click on the Add new client button in the upper-right corner.
In the popup window you will be prompted to give a name and provide authentication information for the new webhook client. You can also set up a base URL and provide additional description for future reference.
Base URL:
You can set up multiple webhooks for each webhook client with slightly different URLs. You can configure the common part of these webhook URLs by setting the base URL for the client and then setting a URL relative to this base URL for different webhooks.
Authentication methods:
- If you choose HTTP Basic Authentication, you'll need to provide a username and a password that will be sent to the client by Team Trax in each webhook request in the Authorization header:
-
Authorization: Basic <the string "<configured username>:<configured password>" encoded in Base64>
-
- If you choose HMAC SHA-256 Authentication, you'll need to provide an app secret that will be used by Team Trax to calculate an SHA-256 hash value of each webhook request body, and then sent to the client in the Authorization header:
-
Authorization: HMAC-SHA256 <SHA256 hash value of the request body encoded in Base64>
-
After you've entered the desired values, please click the Add button. If you think you ended up here by accident, please press Escape key or click Cancel.
These clients are editable and removable in the future.
Once you've created a webhook client, you can add webhooks for this client by clicking the Webhooks button of the webhook client.
Webhooks
Webhooks can be configured by adding them to webhook clients. Webhooks can only be added to an already existing client.
Webhooks belonging to the selected client are listed on this page.

To add a new webhook simply click on the Add New Webhook button in the upper-right corner.

In the appearing modal you will be prompted to select an entity, a supported entity operation and an HTTP method, and to provide a path for the webhook.

Each time the configured operation is executed, an HTTP request will be made to the configured url eg. http://localhost:8080/events/1
The webhook's path can optionally contain variables that will be substituted with properties of the entity. Variables can be included in the path by adding the case sensitive variable name in curly brackets. Available variables depend on the webhook's entity and the operation.
The request's Authorization header will be set based on the webhook client's configuration.
The request's body is in JSON format, and depends on the webhook's entity and the operation.
Entity Types (currently supported):
Events
Operations:
- Event created
- this webhook is called for each event after it has been approved (or after it was requested, if no approval is required)
- Event updated
- this webhook is called after each time an approved event (or an event that doesn't need approval) has been updated, except if an event needs to be re-approved after an event type change, then instead of the event updated webhook:
- first the event deleted webhook will be called (after the type change)
- and then the event created webhook (after the re-approval)
- if an event's type is changed while it is still pending approval, and the event doesn't need approval after the type change, then the event created webhook will be called.
- this webhook is called after each time an approved event (or an event that doesn't need approval) has been updated, except if an event needs to be re-approved after an event type change, then instead of the event updated webhook:
- Event deleted
- this webhook is called for each event after it has been deleted (or after a type change in the above case).
Path variables:
- eventId: the event's ID
- typeId: the event's event type ID
- typeKey: the event's event type key
Request body:
The request body contains a JSON object with all properties of the event.
- Event Properties
| Property name | Type | Description |
|---|---|---|
| id | number | Primary key of the event, used for referencing in update/delete operations |
| eventType | EventType | Details of the event's type |
| startDate | Date | The date the event starts |
| endDate | Date | The date the event ends |
| comment | string | Optional comment/description |
| eventStatus | string | Status of the event (one of "REQUESTED", "APPROVED", "REJECTED") |
| eventStatusByUserId | string | The ID of the user who changed the status of the event last time |
| ownerId | string | The ID of the owner of the event |
| halfDayLong | boolean | Indicates if the event is half day long or not |
| allDayLong | boolean | Indicates if the event is all day long or not |
| customDays | number | The number of the days consumed by this event |
| customDuration | number | The length of the event |
| tenantId | string | The ID of the tenant |
| ownerUser | User | The details of the event's owner user |
| actingUser | User | The details of the event's acting user (who changed the event last time) |
- EventType Properties
| Property name | Type | Description |
|---|---|---|
| id | number | Primary key of the event type |
| name | string | The name of the event type |
| key | string | The key if the event type |
| color | string | The configured color for the event type |
| approvalRequired | boolean | Indicates if the event type requires approval or not |
| syncToExternalCalendar | boolean | Indicates if the event type is syncing to external calendar or not |
| active | boolean | Indicates if the event type is active or not |
| eventTypeLimit | number | The default limit for the event type |
| rank | number | The rank of the event type |
- User Properties
| Property name | Type | Description |
|---|---|---|
| id | string | The identifier of the user |
| username | string | The name of the user |
| valid | boolean | Indicates if the user is valid or not |
Example for request body:
{
    id: 1,
    eventType: {
        id: 1,
        name: 'Home Office',
        key: 'HO',
        color: '#ffb86e',
        approvalRequired: false,
        syncToExternalCalendar: false,
        active: true,
        eventTypeLimit: 0,
        rank: 0
    },
    startDate: '2023-07-14',
    endDate: '2023-07-14',
    comment: 'Description',
    eventStatus: 'APPROVED',
    eventStatusByUserId: 'fake-user-id',
    ownerId: 'fake-user-id',
    halfDayLong: false,
    allDayLong: true,
    customDays: 1,
    customDuration: 1,
    tenantId: 'fake-tenant',
    ownerUser: {
        id: 'fake-user-id',
        username: 'Fake User',
        valid: true
    },
    actingUser: {
        id: 'fake-user-id',
        username: 'Fake USer',
        valid: true
    }
}
End User License Agreement
This End User License Agreement (“EULA” or “Agreement”) is a binding legal agreement between You, (hereinafter as: “Licensee”) and Ixenit Tanácsadó Korlátolt Felelősségű Társaság (registered seat: 52. Pünkösdfürdő street, 1039 Budapest, Hungary, company registration number: 01-09-716069, hereinafter as: “Licensor”) concerning the use of its Software (as defined below) and any our products or services.
By installing, copying, downloading or otherwise using the Software, or by clicking a box indicating your acceptance, Licensee agrees to be bound by the terms of this Agreement. If you are entering into this agreement on behalf of an entity, you represent that you have the authority to bind such entity to the Agreement and are agreeing to the Agreement for that entity. The Agreement does not have to be signed in order to be binding.
IF LICENSEE DOES NOT AGREE TO THE TERMS OF THIS AGREEMENT, THEN LICENSEE MUST NOT INSTALL, COPY, DOWNLOAD OR OTHERWISE USE THE SOFTWARE OR OUR PRODUCTS AND SERVICES.
In order to be fully compliant please review our terms and privacy policy carefully before downloading or using the Software or any of our products or services for the first time.
1. Definitions
1.1. Unless otherwise provided in this Agreement or unless the context doesn’t require to interpret otherwise the following terms in this Agreement shall mean as defined herein:
Authorised User – a person who accesses and uses the Software under the conditions of this Agreement or other referenced policies. The number of Authorised Users may not exceed the number of users purchased via the Atlassian Marketplace (if applicable).
Atlassian – Atlassian Pty Ltd, an Australian corporation (ABN 53 102 443 916);
Atlassian Marketplace – is an online marketplace for on-demand applications and downloadable software applications that interoperate with applicable Atlassian Products. Atlassian Marketplace can be reached on the following link: https://marketplace.atlassian.com
Atlassian Products – any Products developed and sold directly by Atlassian, which are listed on the following link: https://www.atlassian.com/software
Atlassian Supported Platforms – These are the minimum requirements to run the Atlassian Product and / or our Software. For further information please read the official documentation of the respective Atlassian Product or our Software
Intellectual Property – intellectual property means everything We made using our mind especially but not limited to patents and patent applications, trade secrets, technology, processes, designs specifications, tools, applications, databases, data collections, technical data and documentation, copyrightable works (including computer software programs, in both source code and object code form), customer agreements, copyrights, registrations and applications, trade names, logos, trademarks and service marks, marketing materials , know-how etc;
Privacy Policy – Our privacy policy which describes our practice on how we use, disclose and manage data. Your rights and obligations thereto, and shall be found here;
Us or We – Ixenit Tanácsadó Korlátolt Felelősségű Társaság (registered seat: 52. Pünkösdfürdő street, 1039 Budapest, Hungary, company registration number: 01-09-716069) who is the developer of the Software;
You – It means the entity you represent in accepting these Terms of Use and any
2. Scope of the Agreement
2.1. This Agreement governs your initial purchase as well as any future purchases made by you that reference this Agreement. This Agreement shall be interpreted together with our Privacy Policy and any other referenced policies and attachments and also with the general terms of conditions of Atlassian. Please note that any questions or queries not regulated herein or in other referred policies are expressly regulated by the terms of Atlassian. In case of any discrepancy between Our or Atlassian’s terms, the preceding shall be applied.
2.2. This Agreement applies to Ixenit apps or plugins that You purchase from Ixenit on the Atlassian Marketplace or through any other channel.
3. Types of Ixenit Products
This Agreement governs Ixenit’s commercially available software products including Cloud-based products (SaaS or Hosted Services) and Server (Perpetual License).
4. Account Registration
You will have to register for an Atlassian account in order to place orders or access the Software or receive any services or products. Any registration information that You provide to Us or Atlassian must be accurate, current and complete. You must also update Your information so that We may send notices, statements and other information to You by email or through Your account. You are responsible for all actions taken through Your accounts.
5. Authorised Users, terms of use
5.1. Only the specific individuals for whom You have paid the required fees and whom You designate through the Software or any product i.e. the Authorised Users may access and use the Software and any of Our Products. Authorised Users may be You or Your Affiliates’ employees, representatives, consultants, contractors, agents, or other third parties who are acting for your benefit or on Your behalf. You may increase the number of Authorised Users permitted to access Your instance of the Software or any product by placing a new order or, in some cases, directly through the Software or product. In all cases, You must pay the applicable fee for the increased number of Authorised Users. You are responsible for compliance with this Agreement by all Authorised Users.
5.2. You represent and warrant that you are legally entitled to enter into a binding agreement under the laws of Hungary - in particular this Agreement - to use the Software. Otherwise, We will be entitled by law to cancel any agreement entered into with You. You further represent and warrant that you have the right, authority and capacity to use the Software or any of Our products and to abide by the Agreement. If You are registering on behalf of a legal entity, You also represent and warrant that You are authorized to enter into, and bind the entity to these Agreement and the use of the Software.
5.3. By downloading or using the Software or any of Our products You understand and agree that Your use of the Software and any products will also be subject to Our Privacy Policy that may be amended from time to time. By using the Software or any products You also give Your consent as required under our Privacy Policy. Please be informed that We may collect and process Your personal information in line with our Privacy Policy. Further information on Our data protection guideline can be found at the following page: Data Security and Privacy Statement
5.4. We are not liable if You do not use an Atlassian Supported Platform or if You have downloaded / used the wrong version of the Software. We reserve the right to deny You any support and maintenance services (if You are entitled to such benefits), if You use the Software with an incompatible or unauthorized deployment or for purposes other than those for which the Software is intended to be used, or if You breach any terms of this Agreement, or if We notice that You use the Software in a deployment option which does not meet the requirements of Atlassian Supported Platforms.
5.5. Please note our Software are not supporting each version of Atlassian Products, We may reserve the right that Our Software will not be available for older versions of Atlassian Products. In the respective Software’s documentation, or at Atlassian Marketplace You will find the information about which Atlassian Product is supported with our Software.
5,6, By providing Us information, You state that You have the right to provide Us with the information.
6. Software License Rights
6.1. Subject to the terms and conditions of this Agreement, Ixenit grants you a non-exclusive, non sub-licensable and non-transferable license to install and use the Software during the applicable License Term in accordance with this Agreement, excluding Cloud Applications. The term of each Software license (“License Term”) will be specified in Your order. Your License Term will end upon any termination of this Agreement, even if it is identified as “perpetual” or if no expiration date is specified in Your order. The right of use is limited to the Authorized Users.
6.2. You may not (i) copy, modify, adapt, translate, create derivative works from, distribute, license, sell, transfer, publicly display, publicly perform, reproduce, transmit, stream, broadcast, decompile, or disassemble any portion of or otherwise exploit the Software, except as expressly permitted under this Agreement, (ii) license, sublicense, sell, resell, transfer, assign, distribute or otherwise commercially exploit or make available to any third party the Software in any way (except You are entitled to it as stipulated in this Agreement); (iii) create internet "links" to the Software or "frame" or "mirror" any software on any other server or wireless or internet-based device; (iv) reverse engineer or access our software in order to (a) build a competitive product or service, (b) build a product using similar ideas, features, functions or graphics of the Software, or (c) copy any ideas, features, functions or graphics of the Software, (v) launch an automated program or script, including, but not limited to, web spiders, web crawlers, web robots, web ants, web indexers, bots, viruses or worms, or any program which may make multiple server requests per second, or unduly burdens or hinders the operation and/or performance of the Software, (vi) use any robot, spider, site search/retrieval application, or other manual or automatic device or process to retrieve, index, "data mine", or in any way reproduce or circumvent the navigational structure or presentation of the Software or its contents; (vii) post, distribute or reproduce in any way any copyrighted material, trademarks, or other proprietary information without obtaining the prior consent of the owner of the proprietary rights, (viii) remove any copyright, trademark or other proprietary rights notices contained in the Software. No licenses or rights are granted to You by implication or otherwise under any intellectual property rights owned or controlled by Us or Our licensors, except for the licenses and rights expressly granted in this Agreement.
6.3. We will have the right to investigate and prosecute any violations of the above to the fullest extent of the law. We may involve and cooperate with law enforcement authorities in prosecuting users who violate this Agreement.
7. Access to Hosted Services
7.1. Subject to the terms and conditions of this Agreement, Ixenit may grant you a non-exclusive right to access to use the Hosted Services during the applicable Subscription Term (as defined below) in accordance with this Agreement, Your applicable Scope of Use and the Documentation. If Ixenit offers client software (e.g., a desktop or mobile application) for any Hosted Service, You may use such software solely with the Hosted Service, subject to the terms and conditions of this Agreement. You acknowledge that Our Hosted Services are on-line, subscription-based products and that We may make changes to the Hosted Services from time to time.
7.2. Subscription Terms and Renewals
Hosted Services are provided on a subscription basis for a set term specified in your Order (“Subscription Term”). Except as otherwise specified in Your Order, all subscriptions will automatically renew for periods equal to Your initial Subscription Term (and You will be charged at the then-current rates) unless You cancel Your subscription through Your account at my.atlassian.com. If You cancel, Your subscription will terminate at the end of then-current billing cycle, but You will not be entitled to any credits or refunds for amounts accrued or paid prior to such termination.
7.3. Credentials
You must ensure that all Authorised Users keep their user IDs and passwords for the Hosted Services strictly confidential and not share such information with any unauthorised person. User IDs are granted to individual, named persons and may not be shared. You are responsible for any and all actions taken using your accounts and passwords, and you agree to immediately notify Atlassian of any unauthorised use of which you become aware.
7.4. Use and operation of the Software
7.4.1. Our Software can be reached, downloaded and / or purchased at the Atlassian Marketplace. Please note all Software are our own development and they only work with the Atlassian Products as described in the respective Software’s description, and only work if You have an Atlassian Product and You meet the basic terms of using / downloading any Software stipulated herein, or in any other policies or in any terms of Atlassian. The individual Software’s description and documentation also contains - among others – what it can provide and for what purpose We invented it.
7.4.2. Please note, that as Our Software cannot operate without an Atlassian Product, our Software can only work the way We developed it, if (i) Your foundation meets the requirements of Atlassian Supported Platforms, and (ii) if the Atlassian Product works without any fault.
7.4.3. We reserve the right for later updates of Our Software be accessible only for newer versions of Atlassian Products, which means if You would like to have the same user experience You may have to upgrade Your Atlassian Product licence for a newer version.
7.4.4. Our Software and other products can be used in different deployment options i.e. cloud, server or data center deployment options. You will find in the special page of the Software’s or the respective products’s page located at Atlassian Marketplace that in which deployment option You can use the Software.
8. Support and Maintenance
8.1. Ixenit will provide the support and maintenance services for the Products (“Support and Maintenance”) during the period for which You have paid the applicable fee. This Agreement applies to updates, supplements and app components.
8.2. if You send us any support / maintenance related inquiry You are responsible that the provided data are
a) anonymus;or
b) You have the necessary approvals / rights that authorize Us to receive, store, make copies of, modify and to know about personal data
8.3. You also represent and warrant that You are legally entitled to send Us the request.
8.4. Please note when We are providing You support and maintenance services, Your cooperation is indispensable, because without Your active pursuit, We may not be able to give assistance for You. In the frame of the cooperation, We may request You, especially but not limited to send us log files, screenshots, or any other data which may be required to solve Your request. If you fail to provide Us the requested data We may be unable and not be obliged to solve Your support request and it also release Us from any obligation that We may have.
8.5. In order to check that You are entitled to Our support services, We reserve the right to request the SEN number of Our product from You in case of server or data center deployments, or Your site URL in case of cloud deployments. Please note that failing to provide the SEN number or site URL We reserve the right to refuse the support service, even in case You are otherwise entitled for it
9. Fees
9.1. The Licensee must pay all Fees by the due date and in the manner directed at the time of purchase of the Software. Failure to pay Fees by the due date will result in the immediate termination of the licenses granted under this Agreement.
9.2. It is Our sole discretion to provide trial period for the Software however We are not obliged to do so in any way. If trial period is applicable it is indicated on the Software’s Atlassian Marketplace page. Please note however that while You are using the Software in trial licence, You may not be able to use the full functionality of the Software. Differences resulting from this functionality may mean that certain features of the program are not available during the trial period.
9.3. In any other cases, when You are not entitled to trial period or any special terms, You may purchase a licence for the Software or any of Our products through Atlassian Marketplace. Please note that all payments are made through the Atlassian Marketplace based on their special terms and conditions, which is accessible as follows: https://www.atlassian.com/licensing/marketplace/termsofuse. You are only able to purchase a licence for our product on a yearly or monthly base. Please note you are obliged to purchase the Software for the same licence tier as requested by Atlassian.
For more information on Marketplace licencing, please refer to https://www.atlassian.com/licensing/marketplace.
For the Atlassian Marketplace Terms of Use, please refer to https://www.atlassian.com/licensing/marketplace/termsofuse.
9.4. The Fee rates that apply for the Software can be found on Atlassian Marketplace at the Software’s or respective products’s description. We reserve the right to modify or update the rate from time to time with prior notification. Please note that the prices of the Software and any products shown on Atlassian Marketplace does not contain tax.
10. Data Protection and consent
10.1. Ixenit Atlassian apps don’t store or process by any other way the personal data of users. For further details, please refer to Privacy Policy corresponding to the relevant software.
10.2. You agree that We may collect and use technical data and related information (please note that if it is so, You can enable or disable this function anytime in the Software) - including (without limitation) technical information relating to Your device, system, products You use - that is gathered periodically to facilitate the provision of software updates, product support, marketing efforts and other services to You related to our Software. We may use this information, as long as it is in a form that does not personally identify You, to improve Our products or to provide services or technology to You. You can find further information regarding our personal data handling questions in our Privacy Policy.
11. Term and Termination
11.1. Subject to the terms of this Agreement and unless terminated earlier in accordance with this Agreement, the term granted hereunder shall be set out in your License Order. Either party may terminate this Agreement before the expiration of the Subscription Term if the other party materially breaches any of the terms of this Agreement and does not remedy the breach within thirty (30) days after written notice of the breach. Either party may also terminate the Agreement before the expiration of the Subscription Term if the other party ceases to operate, declares bankruptcy, or becomes insolvent or otherwise unable to meet its financial obligations. You may terminate this Agreement at any time with notice to Ixenit, but You will not be entitled to any credits or refunds as a result of convenience termination for prepaid but unused Software, Hosted Services subscriptions, or Support and Maintenance. Except where an exclusive remedy may be specified in this Agreement, the exercise by either party of any remedy, including termination, will be without prejudice to any other remedies it may have under this Agreement, by law, or otherwise. Once the Agreement terminates, you (and your Authorised Users) will no longer have any right to use or access any Products.
12. Disclaimer of Warranties
12.1. Except as expressly stated in the Agreement, Licensor and its third party suppliers provide the Software and any Support and Maintenance AS IS AND WITH ALL FAULTS as despite our best efforts, we cannot undertake more responsibility than Atlassian does because our Software work only in the product deployment options of Atlassian. To the maximum extent permitted by applicable law, Licensor hereby disclaims all other warranties or remedies, whether express, implied or statutory, including but not limited to the performance, condition, merchantability, fitness for a particular purpose, data accuracy, availability, quality, reliability, or that errors and defects will be corrected. Additionally, Licensee acknowledges that Licensor’s Cloud Products are hosted by third-parties, and that the availability of those Cloud Products is subject to a third party’s Service Level Agreement.
13. Limitation of Liability
13.1. Licensor is not liable to for: (a) any loss of use, data, goodwill, or profits, whether or not foreseeable; (b) the cost of procurement of substitute goods, technology or services; or (c) any special, incidental, indirect, consequential, or punitive damages whatsoever (even if Licensor has been advised of the possibility of these damages), including those (i) resulting from loss of use, data, or profits, whether or not foreseeable, (ii) based on any theory of liability, including breach of contract or warranty, negligence or other tortious action, or (iii) arising from any other claim arising out of or in connection with Your use of or access to the Software.
13.2. We apply appropriate and reasonable technical and security measures to keep the Software secure and free from any virus, Trojan horses or similar harmful materials and error free. However, as effective as this technology is, no security system is impenetrable. Please note We try our best in order to secure Our system with the latest technical means (both physical and software related tools), however We cannot guarantee from a technical standpoint that the information You provide will not be intercepted by a malicious third party while being transmitted to Us.
13.3. The Software may be subject to limitations, delays, and other problems as a consequence of using the internet, Your intranet, other inner networks and electronic communications including the device used by You being faulty, not connected, out of range, switched off or not functioning. We are not responsible for any delays, delivery failures, damages or losses resulting from such problems.
13.4. You expressly waive and release Us from any and all liability, claims or damages arising from or in any way related to Atlassian Plc. We will not be a party to disputes, negotiations of disputes between You and Atlassian Plc. Responsibility for the decisions You make regarding our software rests solely with and on You. You expressly waive and release Us from any and all liability, claims, causes of action, or damages arising from Your use of the Software, or in any way related to the Atlassian Plc. introduced to You by the Software.
13.5. The maximum liability of Licensor under this Agreement shall not exceed three times the Fees actually paid by the Licensee for the use of the Software during the past twelve months.
13.6. The limitations and exclusions in this Section apply to the maximum extent permitted by law.
14. Confidentiality
14.1. Except otherwise set forth in this Agreememt, each party agrees that all code, inventions, know-how and business, technical and financial information disclosed to such party (“Receiving Party”) by the disclosing party ("Disclosing Party") constitute the confidential property of the Disclosing Party (“Confidential Information”), provided that it is identified as confidential at the time of disclosure or should be reasonably known by the Receiving Party to be confidential or proprietary due to the nature of the information disclosed and the circumstances surrounding the disclosure. Any information relating to the Software will be deemed our Confidential Information without any marking or further designation. Except as expressly authorized herein, the Receiving Party will (1) hold in confidence and not disclose any Confidential Information to third parties and (2) not use Confidential Information for any purpose other than fulfilling its obligations and exercising its rights under this Agreement. The Receiving Party may disclose Confidential Information to its employees, agents, contractors and other representatives having a legitimate need to know, provided that they are bound to confidentiality obligations no less protective of the Disclosing Party than this Section 15 and that the Receiving Party remains responsible for compliance by them with the terms of this Section 15. The Receiving Party's confidentiality obligations will not apply to information which the Receiving Party can document: (i) was rightfully in its possession or known to it prior to receipt of the Confidential Information; (ii) is or has become public knowledge through no fault of the Receiving Party; (iii) is rightfully obtained by the Receiving Party from a third party without breach of any confidentiality obligation; or (iv) is independently developed by employees of the Receiving Party who had no access to such information. The Receiving Party may also disclose Confidential Information if so required pursuant to a regulation, law or court order (but only to the minimum extent required to comply with such regulation or order and with advance notice to the Disclosing Party). The Receiving Party acknowledges that disclosure of Confidential Information may cause substantial harm for which damages alone may not be a sufficient remedy, and therefore that upon any such disclosure by the Receiving Party the Disclosing Party may be entitled to appropriate equitable relief in addition to whatever other remedies it might have at law.
15. Intellectual property
15.1. The Software – including their name – are protected by copyright, and other rights provided under the laws of Hungary. We (and our licensors, if applicable) exclusively own all rights, title and interest in and to the Software, including all associated intellectual property rights.
15.2. Without derogating from our rights under any applicable law or this Agreement, You are advised that any attempted or actual infringement of this provision will result in the termination of all your rights under this Agreement. Please note that You are bound by this Agreement to immediately cease any and all use of the Software in case you circumvent any of the means taken by us to protect the Software from unauthorized use.
16. Governing Law and jurisdiction
16.1. Any disputes or claims arising out of or in connection with the subject matter or formation (including non-contractual disputes or claims) of the Agreement are governed by and construed in accordance with the laws of Hungary. Any and all disputes arising from the use of our services shall be governed by the exclusive jurisdiction of the Competent Hungarian Courts based on our registered seat.
17. Final Provisions
17.1. Notices
All notices to Licensor will be sent to: Ixenit Kft., 52. Pünkösdfürdő street, 1039 Budapest, Hungary, support@ixenit.com All notices to Licensee will be sent to the physical address or the email address provided by Licensee upon Purchase of the Software.
17.2. Modification and amendment
17.2.1. This Agreement may not be modified or amended by You without our written agreement (which may be withheld in our complete discretion without any requirement to provide any explanation).
17.2.2. This Agreement may be modified, varied and changed from time to time. We will notify you through Our Website and/or send You an email of the modifications, variations and/or changes to the Agreement at least 30 days before the modification comes into force. The continued use of the Software after receipt of this notice will constitute Your consent to and acceptance of the modifications, amendments, variations, and/or changes. Please note that we reserve the right to terminate any or all of our Agreement. In such case we will notify you with a 90-day notice period, before we stop our operation.
17.3. Survival
The following provisions will survive any termination or expiration of this Agreement: Sections 6 (Software Lincence Rights), 13 (Disclaimer and Warranties), 14 (Limitation of Liability (solely with respect to claims arising from your use of the Software) 15 (Confidentiality) 16 (Intellectual Property), 17 (Governing Law and dispute resolution).
17.4. Miscellanous
17.4.1. Our waiver or forbearance or failure to claim a breach of any provision of these Terms of Use or to exercise any right provided by this Agreement or the applicable law, may not be deemed to constitute a waiver with respect to any subsequent breach of any provision hereof.
17.4.2. No joint venture, partnership, employment, or agency relationship exists between You, Us or any third-party provider as a result of this Agreement or use of the Software.
17.4.3. As the Software are strictly Atlassian Product connected software solutions, You are not entitled to transfer or assign Your rights under this Agreement, except if Atlassian allows it, or if You have the right for such assignment in Your legal system.
17.4.4. If any term of this Agreement is held to be illegal, invalid or unenforceable, in whole or in part, under any enactment or rule of law, the term or part of it will, to that extent, be deemed not to form part of this Agreement but the legality, validity or enforceability of the remainder of this Agreement will not be affected.
17.4.5. This Agreement is governed by and to be construed under the laws of Hungary especially the Civil Code and the Act on Copyright.
17.4.6. Neither party will be liable to the other for any delay or failure to perform any obligation under this Agreement (except for a failure to pay fees) if the delay or failure is due to events which are beyond the reasonable control of such party, such as a strike, blockade, war, act of terrorism, riot, natural disaster, failure or diminishment of power or telecommunications or data networks or services, or refusal of a license by a government agency (Force Majeure).
17.4.7. This Agreement is the entire agreement between You and Us relating to the Software and supersedes all prior or contemporaneous oral or written communications, proposals and representations between You and Us with respect to the Software or any other subject matter covered by this Agreement. No provision of any purchase order or other business form employed by you will supersede or supplement the terms and conditions of this Agreement, and any such document relating to this Agreement will be for administrative purposes only and will have no legal effect.
Data Security and Privacy Statement
You are reading this document because You are using the software developped by Ixenit Kft. Please note that it is very important to our Company that Your personal data is properly processed and protected and Your related rights are respected.
To achieve the above goals present privacy policy (hereinafter as: “Policy”) in accordance with Regulation (EU) 2016/679 of the European Parliament and of the Council on the protection of natural persons with regard to the processing of personal data and on the free movement of such data, and repealing Directive 95/46/EC (hereinafter as: “GDPR”) contains all information regarding the processing of personal data provided to Us by the users (hereinafter as: “User”) of Our software named TeamTrax (hereinafter as: “Software”) developed and operated by
Company name: Ixenit Tanácsadó Korlátolt Felelősségű Társaság
Registered seat: 52. Pünkösdfürdő street, 1039 Budapest, Hungary
Company registration number: 01-09- 716069
Tax number: 13045513-2-41
Registered by: Company Registry Court of the Metropolitan Court of Budapest
Represented by: Zoltán Magyar as managing director individually
E-mail: info@ixenit.com
(hereinafter as: „Service Provider”)
and available at the Atlassian Marketplace operated by Atlassian.
The purpose of the Policy is to provide an accurate picture of why and how, and for how long, we process personal data relating to Users who are using the Software.
A few data privacy related definitions to better understand the Policy
Personal data
means any information relating to an identified or identifiable natural person (‘data subject’); an identifiable natural person is one who can be identified, directly or indirectly, in particular by reference to an identifier such as a name, an identification number, location data, an online identifier or to one or more factors specific to the physical, physiological, genetic, mental, economic, cultural or social identity of that natural person.
Processing
means any operation or set of operations which is performed on personal data or on sets of personal data, whether or not by automated means, such as collection, recording, organization, structuring, storage, adaptation or alteration, retrieval, consultation, use, disclosure by transmission, dissemination or otherwise making available, alignment or combination, restriction, erasure or destruction.
Controller
means the natural or legal person, public authority, agency or other body which, alone or jointly with others, determines the purposes and means of the processing of personal data; where the purposes and means of such processing are determined by Union or Member State law, the controller or the specific criteria for its nomination may be provided for by EU or Member State law.
The controller of your personal data is the Service Provider.
Processor
means a natural or legal person, public authority, agency or other body which processes personal data on behalf of the controller.
Third party
means a natural or legal person, public authority, agency or body other than the data subject, controller, processor and persons who, under the direct authority of the controller or processor, are authorized to process personal data.
Data forwarding
Means the disclosure of personal data to specific third parties.
Data subject
Everybody who shares his/her personal data with the Service Provider through the Website or via other channels or whose personal data is processed by the Service Provider otherwise. For example, you who reads this Policy.
Consent of the data subject
means any freely given, specific, informed and unambiguous indication of the data subject's wishes by which he or she, by a statement or by a clear affirmative action, signifies agreement to the processing of personal data relating to him or her.
Sensitive data
personal data referring to racial origin, nationality, political opinions or membership in any political party, religious or other beliefs, membership of an advocacy organization, sex life, personal data concerning health, pathological data.
Genetic data
means personal data relating to the inherited or acquired genetic characteristics of a natural person which give unique information about the physiology or the health of that natural person and which result, in particular, from an analysis of a biological sample from the natural person in question.
Biometric data
means personal data resulting from specific technical processing relating to the physical, physiological or behavioral characteristics of a natural person, which allow or confirm the unique identification of that natural person, such as facial images or dactyloscopy data.
Personal data breach
means a breach of security leading to the accidental or unlawful destruction, loss, alteration, unauthorized disclosure of, or access to, personal data transmitted, stored or otherwise processed.
Most of the above definitions are used by the GDPR. The full text of the GDPR is available at https://eur-lex.europa.eu/legal-content/EN/TXT/HTML/?uri=CELEX:32016R0679&from=HU. The above list is not complete so should you need more information or explanation do not hesitate to contact us.
We would like to inform You that during our processing we do not process or request from You any sensitive, genetic or biometric data.
Other definitions
Atlassian
Atlassian Pty Ltd, an Australian corporation (ABN 53 102 443 916)
Atlassian Marketplace
is an online marketplace for on-demand applications and downloadable software applications that interoperate with applicable Atlassian Products. Atlassian Marketplace can be reached on the following link: https://marketplace.atlassian.com;
Website
means the websites available at the domain https://www.ixenit.com that is operated by the Service Provider and through which the visitors may acquire information on the Service Provider, the Software and the services provided by the Service Provider
User
means collectively during the interpretation of present Privacy the visitor of the Website, the person requesting offer or consultation, the person subscribing to newsletter and the user of the Service (regardless of the user level), the person applying for support on behalf of a nonprofit organization, the person applying for a position, furthermore person who attend to an event either as visitor or as speaker or expert
III. In which cases do we process personal data?
In accordance with the principles laid down by Article 5 Section (1) of the GDPR the personal data of the User is processed in the following cases:
- Browsing the Website
- Using the Software
- Contacting
IV. What data, for what purpose and for how long do we process?
In the cases detailed above the legal ground for processing shall be the following:
- In accordance with article 6 Section (1) Point a) of the GDPR the freely given, specific, informed and unambiguous consent of the User (hereinafter as: „Consent”).
- In accordance with article 6 Section (1) Point b) of the GDPR processing is necessary for the performance of a contract to which the User is party (hereinafter as: „Performance of Contract”).
- In accordance with article 6 Section (1) Point c) of the GDPR processing is necessary for compliance with a legal obligation to which the controller is subject (hereinafter as: „Compliance”).
- In accordance with article 6 Section (1) Point f) of the GDPR processing is necessary for the purposes of the legitimate interests pursued by the controller or by a third party (hereinafter as: „Legitimate Interest”).
With respect to that we are not able to limit the amount of personal data may be sent to us by the User via any communication channel, because we have no influence on the User who voluntarily provide personal data, therefore we kindly request You that please only provide the most necessary information and data that is prescribed by the Service Provider in present Policy when contacting us in any was so do not share any personal data that we do not request or wish to handle under this Policy. If, despite our explicit request under this section, you provide us with information that is not necessary for the purposes of processing personal data and that may subsequently be detrimental to our Company, then by accepting present Policy You undertake to exempt our Company from any harmful consequences, including fines.
IV.1. Browsing the Website
| Scope of data processed | Purpose of processing | Ground for processing | Naming of legitimate interest | Duration of processing |
|---|---|---|---|---|
| IP address of the User | Protection of the IT systems of the Service Provider and securing the Website | Legitimate Interest of the Service Provider | Protection of the IT systems of the Service Provider and securing the Website | 30 days from visiting the Website as latest |
The Website may be freely visited and browsed by the User without expressively providing any personal data to the Service Provider. However, when visiting the Website at any time, the User’s computer or mobile device sends a request to the Service Provider. It is like sending a letter to which You wish to get the content of the Website as an answer. The Service Provider can only answer this request if the User provides his/her address. This address is the User’s internet identifier address, IP address for short. The Service Provider sends the requested Website to this IP address. This is an automatic process, by typing the domain of the Website to the web browser or by clicking to a link published anywhere that is directing to the Website the User gives his/her consent to provide the IP address for this purpose and to be processed by the Service Provider. To make this „correspondence” smooth the servers of the Service Provider store the IP address of the User in log files.
The identification and storing of IP addresses is necessary to protect the IT systems of the Service Provider and the Website as well. Protection against possible malicious activities against the Website is partly ensured by that the Service Provider is logging the operation of the Website and in this log, it lists the IP addresses from which requests to its servers were made. If the Service Provider detects an activity from an IP address that interferes with the secure operation of the Website, he addresses will be blacklisted. Any malicious activity is prevented and resolved through legal action. If nothing unordinary occurs, the Service Provider deletes the log files and the IP addresses. IP addresses stored in log files will not be used by the Service Provider for any other purpose and will be automatically deleted within 90 days and we keep it only if the User has performed any prohibited activity from that IP address. These activities are either listed above or other activities that violate local, state, national or international law.
IV.2. Using the Software
| Scope of processed data | Purpose of processing | Ground for processing | Duration of processing |
|---|---|---|---|
| Atlassian ID of the User | Identifying the User | Performance of Contract | Until the end of the User’s subscription to the Software |
IV.3. Contacting
In order to help the Users using our Software We maintain a helpdesk to provide technical assistance and information to Users.
If the User contacts the helpdesk by e-mail at the address info@ixenit.com then by sending the e-mail the User acknowledges the processing of his/her personal data. In order to be able to fulfill Your requests, certain personal data must be processed. Without these, we will not be able to complete Your request as we would not be able to contact You
| Scope of processed data | Purpose of processing | Ground for processing | Duration of processing |
|---|---|---|---|
| E-mail address of the User | Identifying the User, fulfillment of requests | Performance of Contract | Until 31st December of the second year following the year in which the request was resolved. |
| First and last name of the User | Identifying the User, fulfillment of requests | Performance of Contract | Until 31st December of the second year following the year in which the request was resolved. |
| The social media contact of the User possibly shared by the User in his/her e-mail „signature” | - | Performance of Contract | Until 31st December of the second year following the year in which the request was resolved. |
V. Where and how my personal data is stored?
All personal data is stored electronically on trusted secure servers. The data we store is either on a server located within the European Union or on a server of a processor who is properly certified in relation to the processing of personal data.
The Service Provider ensures the protection of data on several levels (physically, technically and organizationally), which in each case comply with industry standards.
Notwithstanding the above, the Service Provider shall not be liable for any damage, destruction or unauthorized access to the data in the event of technical error, natural disaster, terrorist or criminal act.
VI. How can You withdraw Your consent if the ground for processing is based on consent?
If under present Policy the legal ground of processing is the data subject's i.e., the User's consent, then the User has the right to withdraw this consent. Depending on the purpose of processing there are many ways to do it. You may withdraw Your consent given at browsing at any time, free of charge and without limitation by revisiting the Website and clicking on the pop-up window. In addition, if You do not have the possibility to withdraw Your consent this way, you may withdraw it by sending a message to info@ixenit.com or in case of newsletter subscription by clicking on the "Unsubscribe" button at the bottom of the email or by sending a letter to the Service Provider's headquarters address.
Please note that the withdrawal of consent does not affect the legality of the processing prior to the withdrawal.
VII. What rights do You have in connection with processing Your personal data?
Request for information (right to access): You may request information about the processing of Your personal data at any time, either in person, at our registered seat address, in writing by sending a registered letter or by email to info@ixenit.com.
Pursuant to Article 15 Section (1) of the GDPR, a request may include information on the data processed, their source, purpose, legal ground, duration, name and address of any processor, processing activities and Your rights in relation to processing. In the case of data transfer, to whom and for what purpose Your data have been or will be transferred.
A request for information is considered authentic by us if You are clearly identified by it. If the request is sent by e-mail or post, only the e-mail sent from Your registered e-mail address will be considered as authentic, and we will only be able to send information to the postal address registered by us. Unless You voluntarily verify Your identity otherwise, we will not be able to send information to an e-mail address or postal address that is not registered in our records in order to protect Your privacy.
Rectification: You may at any time request the rectification, modification or amendment of Your data in the same manner described above. We can also do this only on the basis of a request from a credible source presented when submitting the request.
Restriction: You may request that we restrict the processing of our personal information in particular if:
- a) You argue the accuracy of the personal data we process. In this case, the limitation refers to the period during which the accuracy of the data is checked.
- b) Although the legal ground for processing does not stand for us, but You are requesting us in writing to keep them for the purpose of filing, asserting or defending any legal claim You may have
Objection: If we process Your personal data on the ground of legitimate interest, You may at any time object to the processing of Your personal data. In such cases, we will review the legality of the objection and, if it is well established, we terminate the processing of data and notify anyone to whom the personal data subject to the objection may have been previously transmitted.
Deletion (“Right to be forgotten”): You may request the deletion of Your personal data at any time for any of the reasons set out in Article 17 Section (1) of the GDPR.
We may refuse deletion if the processing of Your personal data is required by law or if it is necessary to enforce our legal claims. We will always inform You about the refusal of the request for deletion. Once it is deleted, the data cannot be recovered.
Transfer of Personal Data (Portability): You may at any time request us to transfer the data processed in connection with You in a structured, widely used, machine-readable format to You or to another controller.
We kindly ask You to not exercise the above rights improperly, but only if it has a real ground or if any of the conditions set out in the GDPR actually exist.
VIII. To whom we transfer personal data and who has right to access them?
VIII.1. Amazon Web Services (AWS)
The Service Provider stores and operates the Software through Amazon Web Services a cloud-based webserver which may be reached at:
Company name: Amazon Web Services Inc.
Registered seat: 410 Terry Avenue North, Seattle, WA 98109-5210, USA
E-mail: EU-privacy-DSR@amazon.com
Phone number: +1 206 266 1000
Represented by: Eva Gehlin and Barbara Scarafia directors
European server locations: London, Frankfurt, Stockholm, Paris, Dublin
(hereinafter as: “Amazon”)
Although the Service Provider use the servers of Amazon located outside the territory of the European Union, namely in the United States Your data is still secure and protected by the provisions of the GDPR, as in the event Amazon processes data outside the European Union, it will provide adequate protection in accordance with the provisions of the GDPR as Google has undertaken to comply with the code of conduct called Standard Contractual Clauses (SSC) approved by the Court of Justice of the European Union in accordance with the provisions of Article 40 of the GDPR, which ensures that transfers of data from the EU to third countries outside the European Union to a controller or processor outside the EU.
More information on SCC is available at https://ec.europa.eu/info/law/law-topic/data-protection/international-dimension-data-protection/standard-contractual-clauses-scc_hu
Information on Amazon’s processing in compliance with SCC can be found here: may be found at https://aws.amazon.com/blogs/security/aws-gdpr-data-processing-addendum
Amazon ensures the protection of data on multiple levels, physically protecting data storage servers, its infrastructure through uninterruptible power supplies and other advanced tools, limiting access to data, continuous monitoring of its system, encryption, and finally, environmentally selecting data center locations, because Amazon set up its data centers in places where it is not exposed to nature, such as seismic activity. More information about Amazon's security solutions is available at https://aws.amazon.com/compliance/data-center/data-centers
Amazon’s general privacy policy can be reached at: https://aws.amazon.com/privacy
VIII.2. Correspondence (e-mail)
The Service Provider uses Google Inc.'s Gmail GSuite service to communicate via email:
Company name: Google Ireland Ltd
Registered seat: Google Building Gordon House, 4 Barrow St, Dublin, D04 E5W5, Ireland
Registration number: 368047
Represented by: Elizabeth Margaret Cunningham director
Phone: +353 1 436 1000
Data center: Dublin, Ireland
(hereinafter as: “Google”)
Google processes EU related data within the territory of the European Union through its servers located in Dublin, Ireland. Google may not access, modify, delete, use or otherwise manipulate the User related data stored on the server provided by Google. If, for any reason, Google processes personal data outside the European Union, it will provide adequate protection in accordance with the provisions of the GDPR as a result of being subject to the SCC code of conduct. Learn more at https://policies.google.com/privacy/frameworks
Google provides the protection of data on multiple levels, such as physically protecting data storage servers, which are secured and supervised by security guards and technicians, it restricts access to server rooms by its employees and by providing uninterruptible power supply and other state-of-the-art infrastructure, restricting access to data, continuously monitoring its system, encryption and firewall protection. The Google Privacy Policy is available at https://policies.google.com/privacy
IX. What are the responsibilities with regard to the personal data You provide?
When You provide us Your personal data, you are responsible for ensuring that the information and contributions You make are true and correct.
We ask You to provide us third-party data only if specifically authorized to do so by the third party. Our company assumes no liability for any resulting claims.
If a third-party object the processing of personal data by credibly verifying its identity, we will immediately delete third-party data without notifying You. Please only provide third-party personal data only if you have informed the third party of the availability of this Policy.
X. Management of Personal data breach
Any personal data breach that may occur will be reported to the supervisory authority within 72 hours from becoming known to us in accordance with the law, and we will also maintain records of any breach that may occur. In the cases specified by law, we also inform the User or Data subject concerned.
XI. Data Protection Officer (DPO)
Pursuant to Article 37 of the GDPR appointment of a DPO is mandatory if:
- a) the processing is carried out by a public authority or body, except for courts acting in their judicial capacity.
- b) the core activities of the controller or the processor consist of processing operations which, by virtue of their nature, their scope and/or their purposes, require regular and systematic monitoring of data subjects on a large scale; or
- c) the core activities of the controller or the processor consist of processing on a large scale of special categories of data pursuant to Article 9 and personal data relating to criminal convictions and offences referred to in Article 10. With respect to that the Service Provider is not subject to any of the clauses above and because there is no other compelling reason to appoint a DPO we are not appointing anyone for this position.
XII. Amendment of the Privacy Policy
If the scope of the processed data, the legal ground of the processing or other circumstances change, this Policy will be amended and published in accordance with the provisions of the GDPR and the User will be notified of such change given that the changes will become effective from the 5th business day following the date of publication. Please be sure to read the Policy changes carefully as they contain important information about the processing of Your personal data.
XIII. Whom You may contact for information regarding Your personal data or to exercise Your rights?
If You have any questions, please contact us by email info@ixenit.com, phone +36 1 886 2673 or at 52. Pünkösdfürdő street, 1039 Budapest, Hungary
The User is entitled to exercise his / her rights related to the processing of personal data against the Service Provider as controller. If You wish to exercise Your rights, you must first notify the Service Provider
If You feel that Your rights have been violated, you can complain to the National Authority for Privacy and Freedom of Information:
Name: National Authority for Privacy and Freedom of Information
Address: 1055 Budapest, Falk Miksa utca 9-11., Hungary
Mailing address: 1363 Budapest, PO box: 9., Hungary
Phone: +36 1 391 1400
E-mail: ugyfelszolgalat@naih.hu
Website: https://www.naih.hu